Maps and useful informations
| Floor | Map |
|---|---|
| 1st Floor | 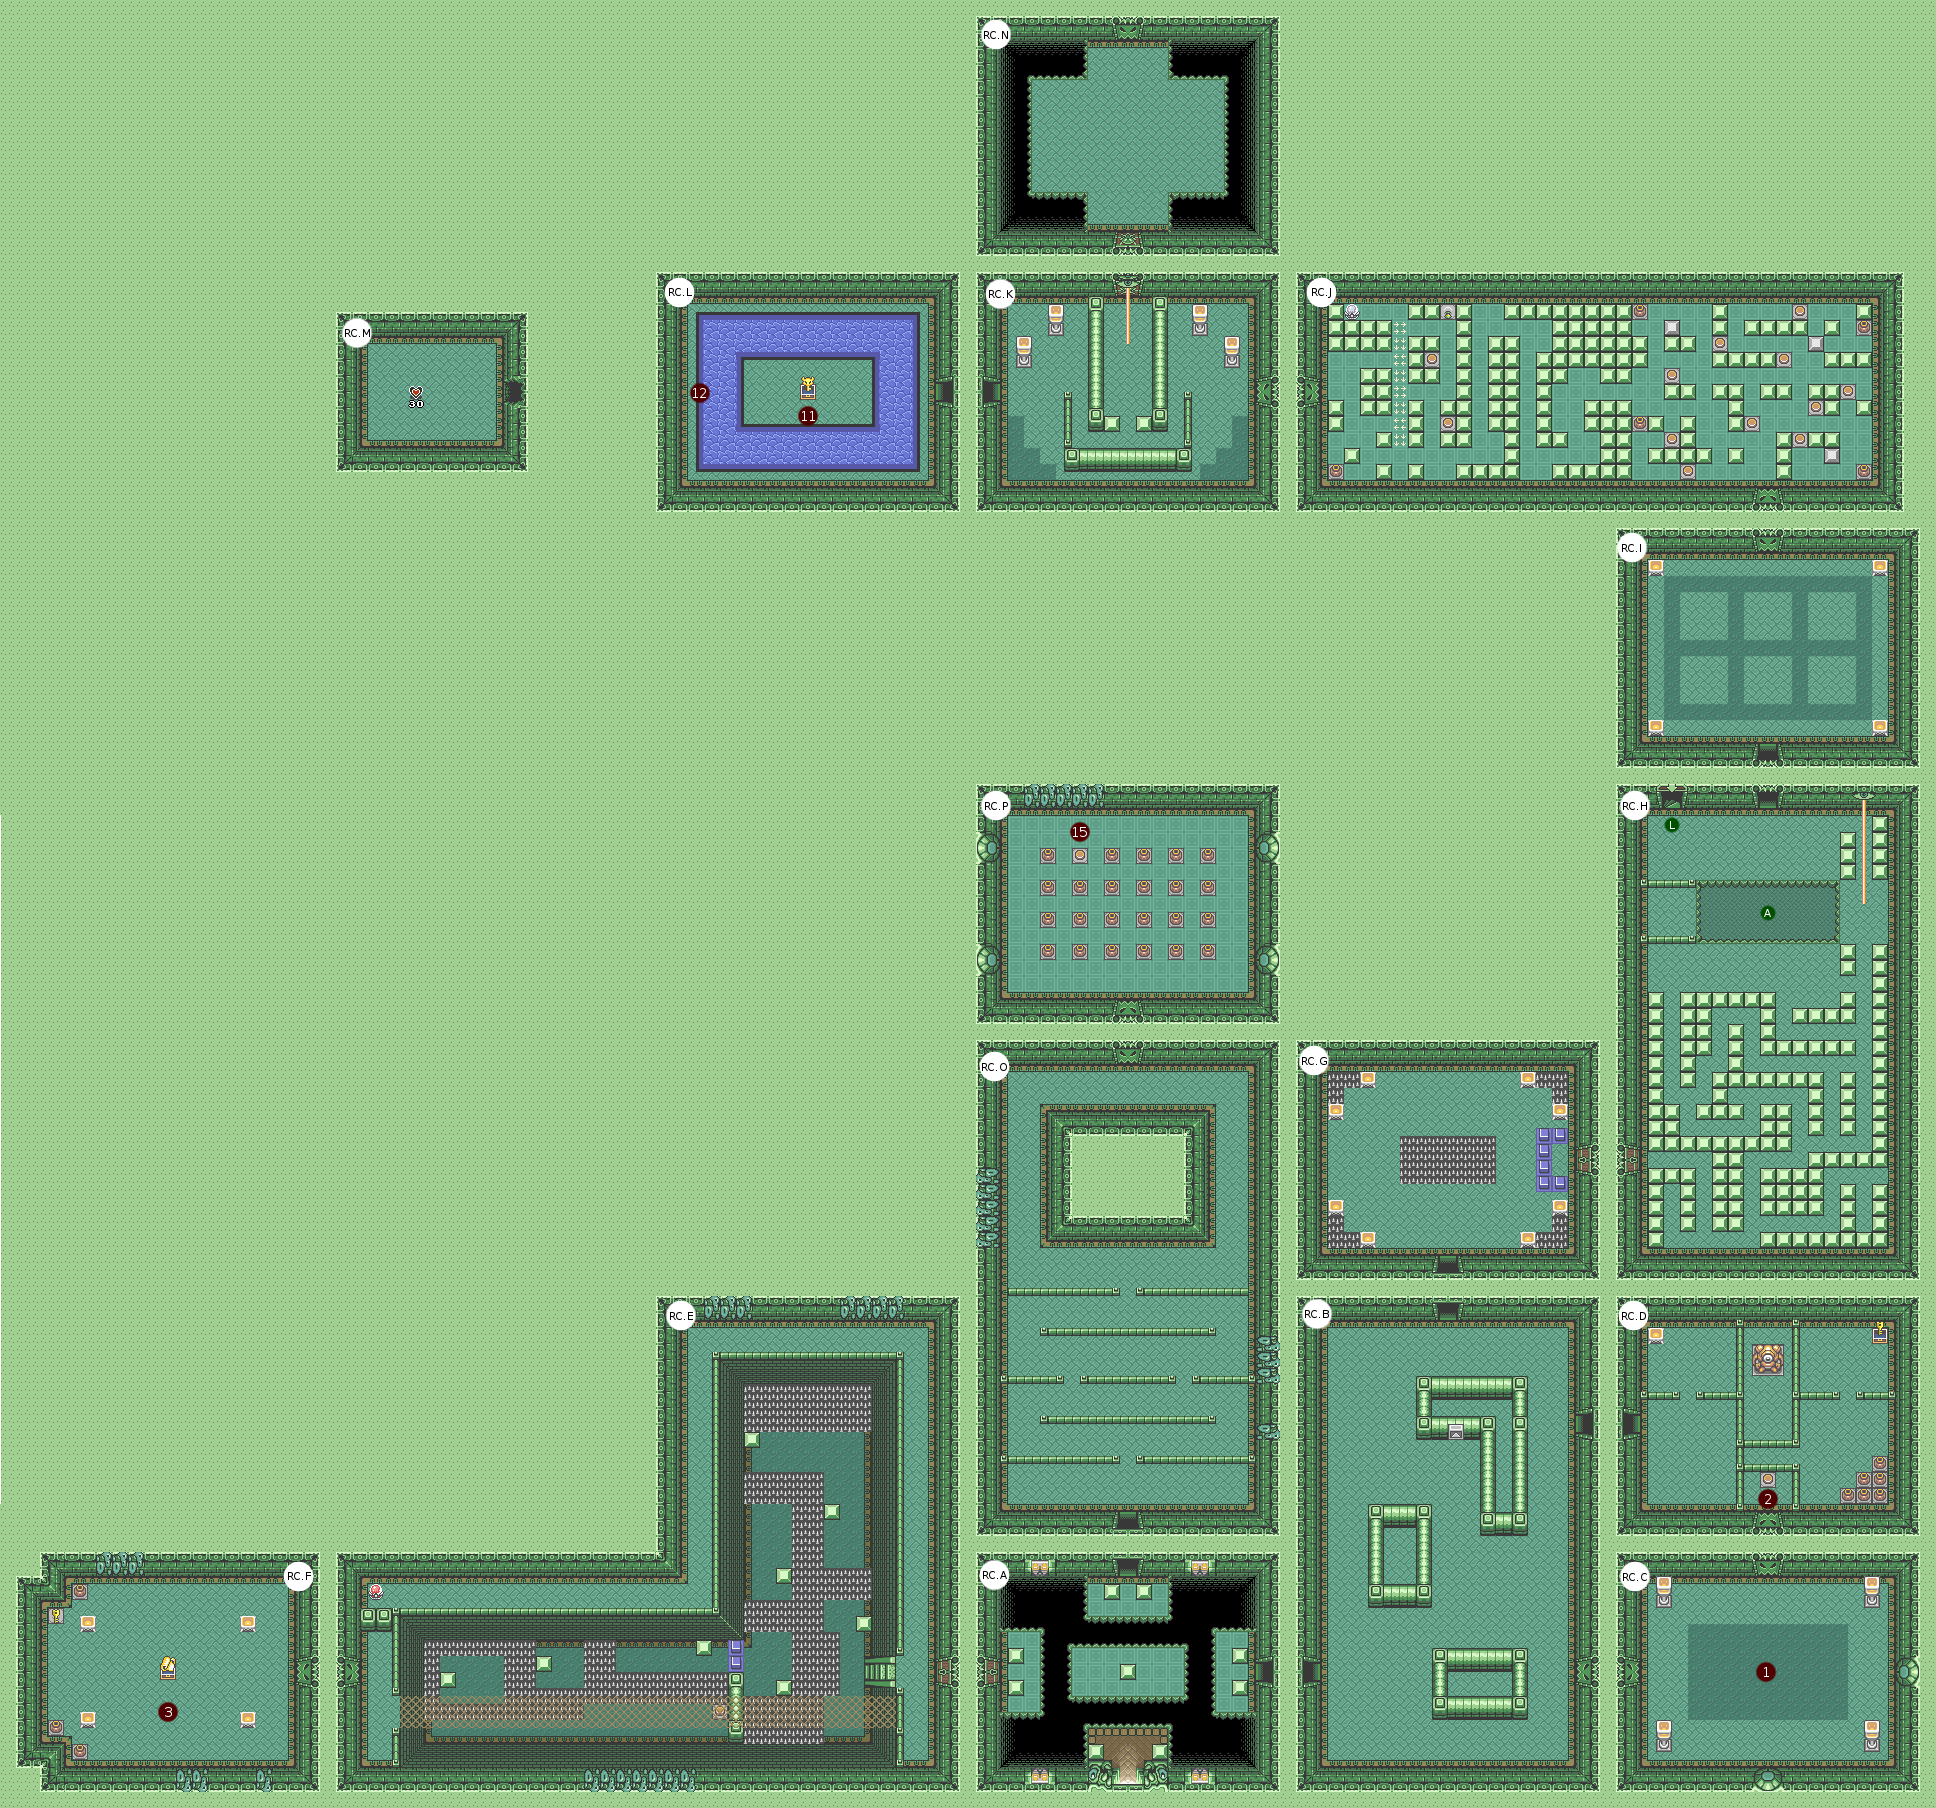 |
| Basement 1 | 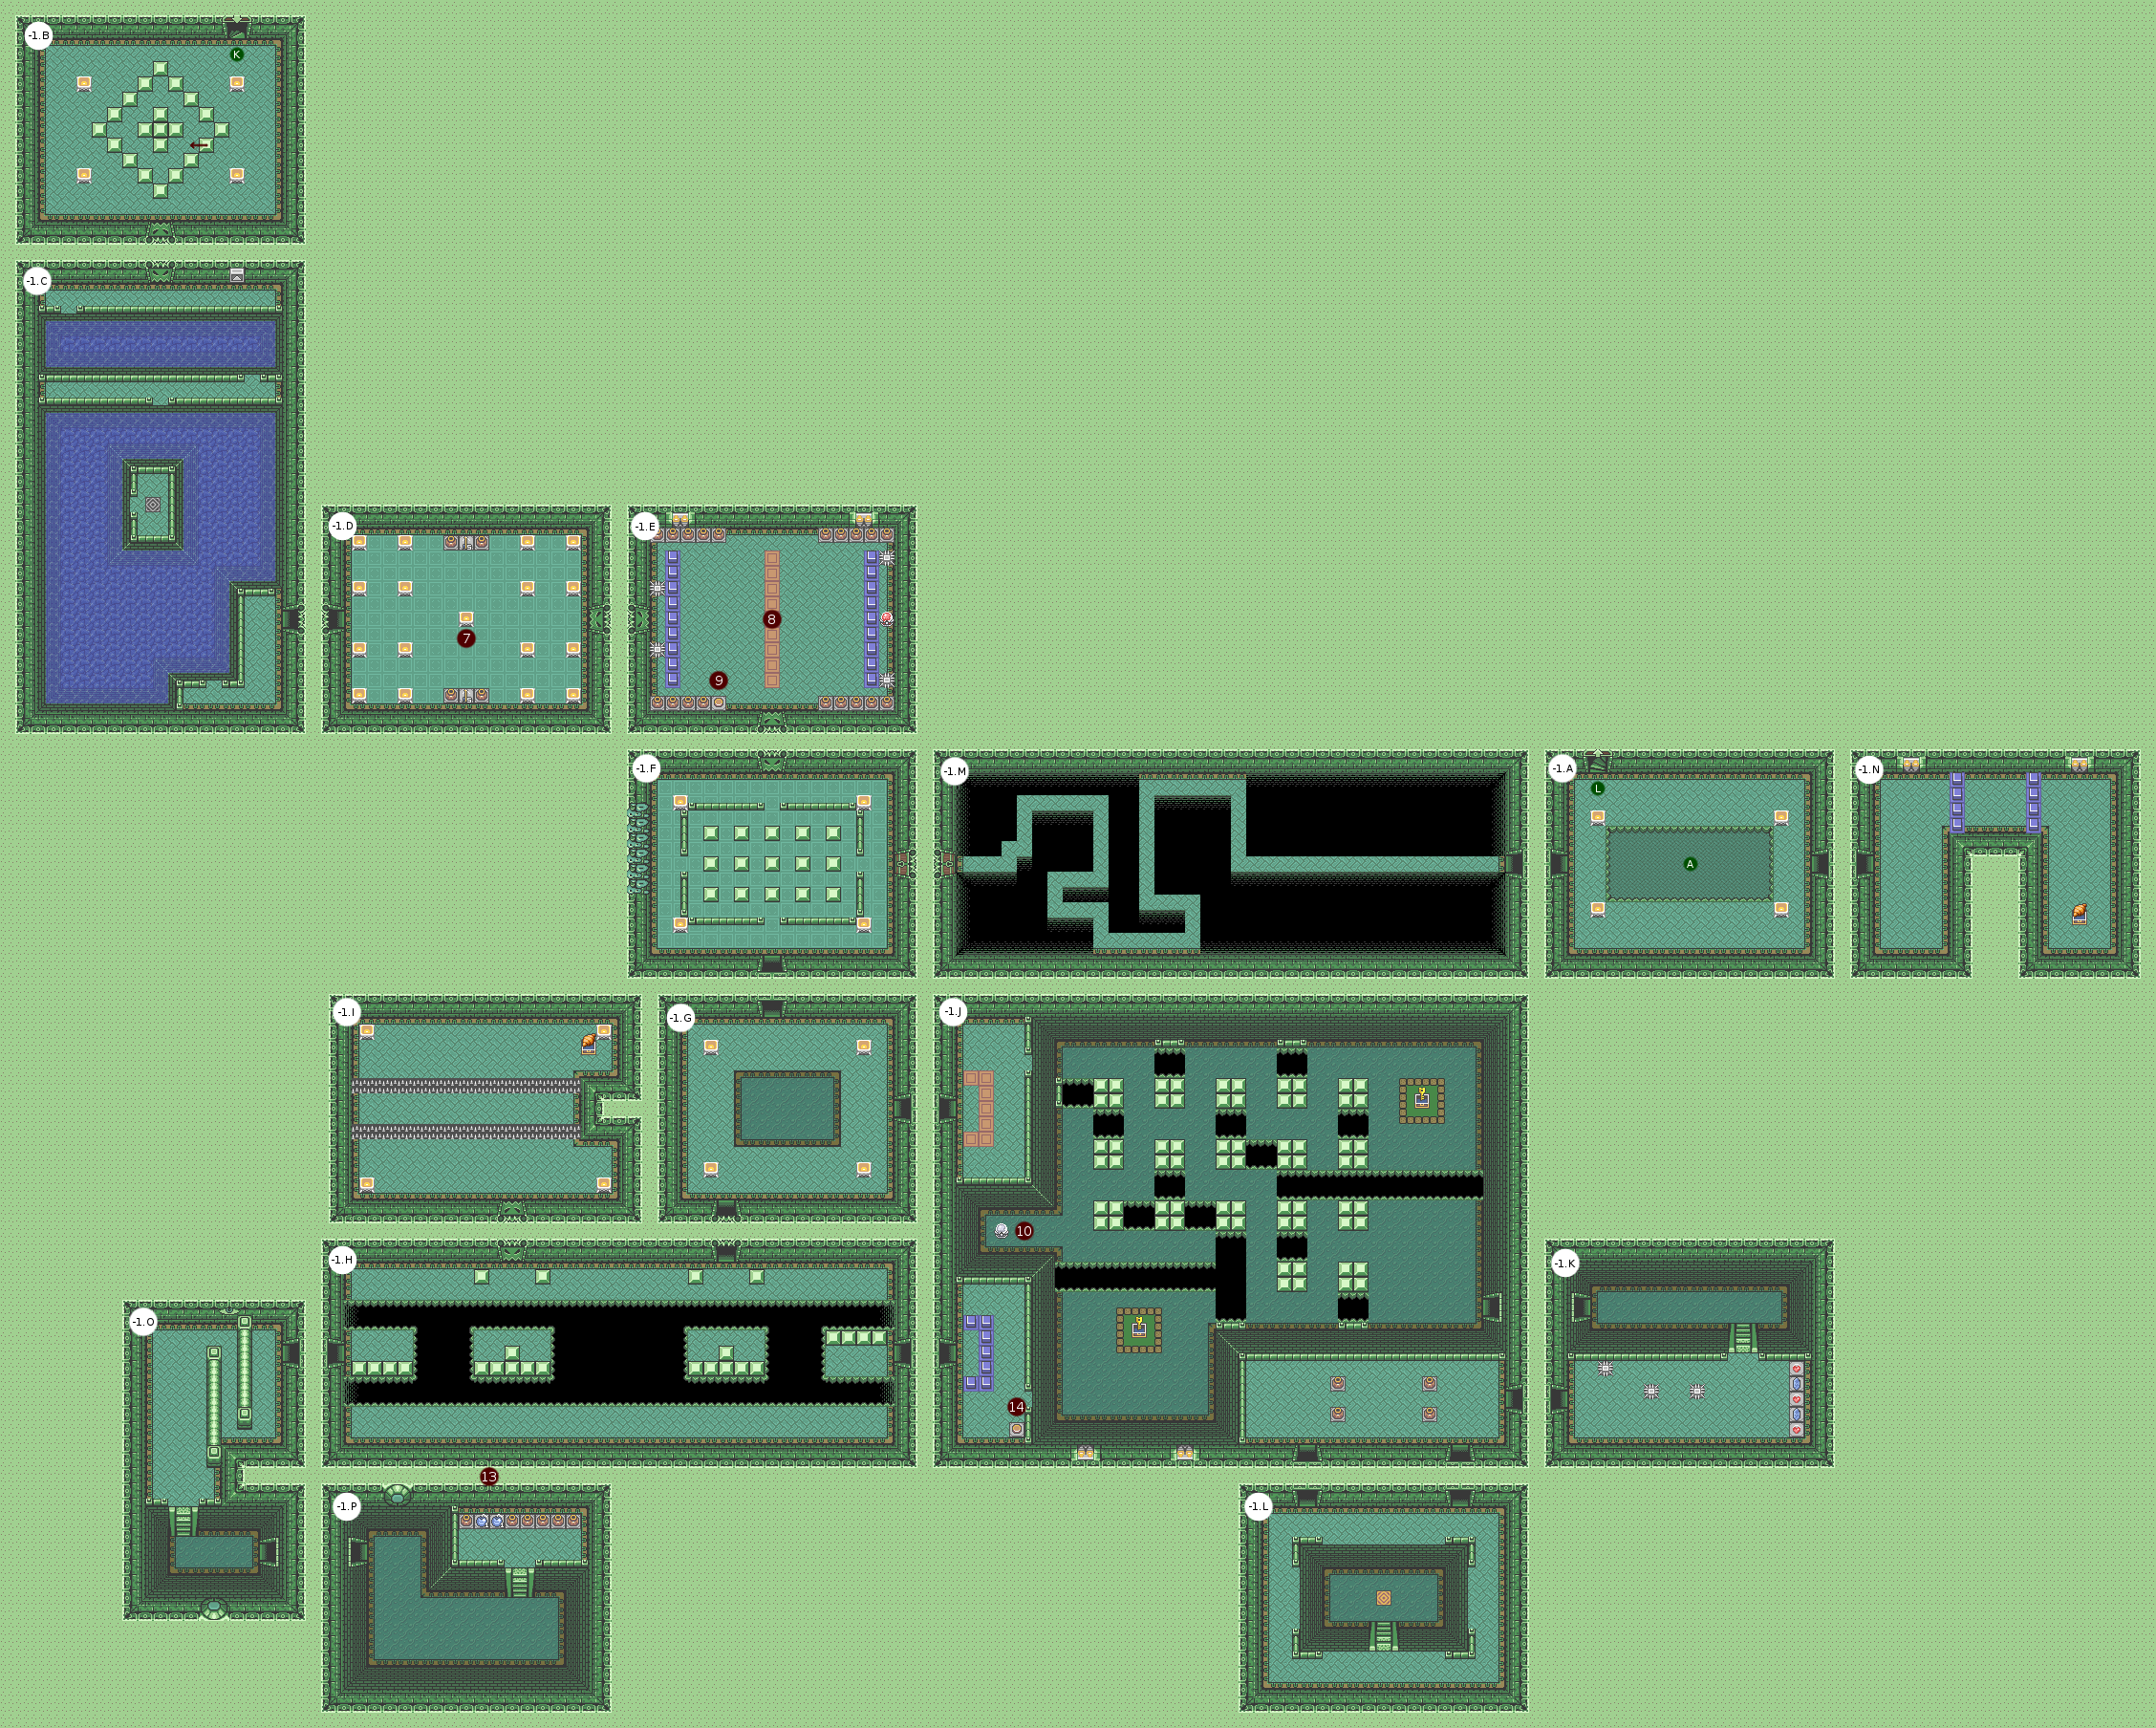 |
| Basement 2 | 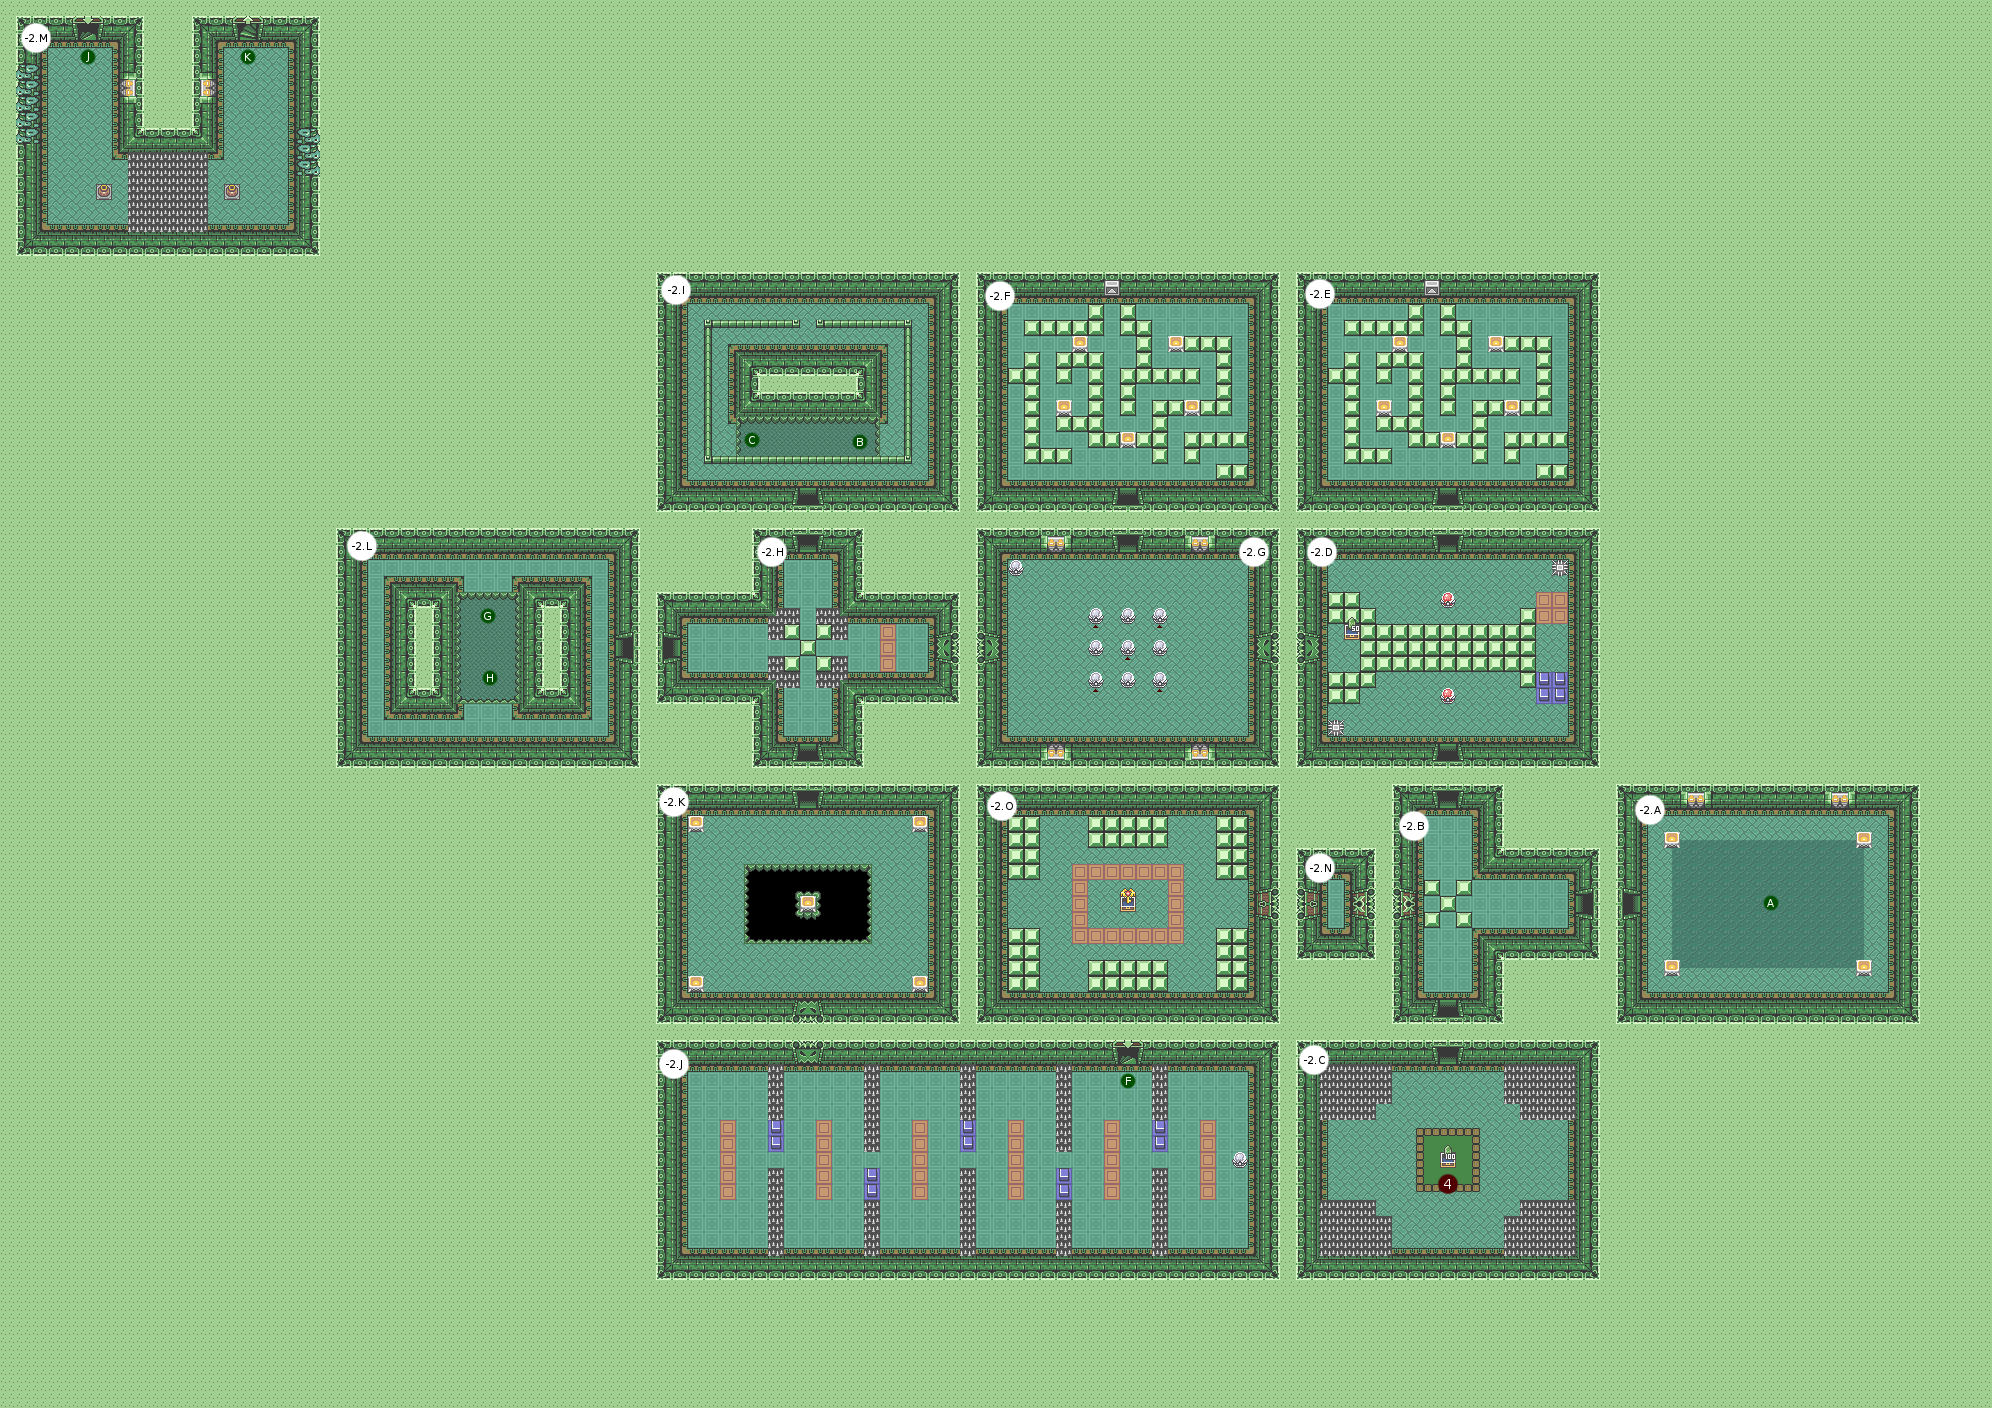 |
| Basement 3 | 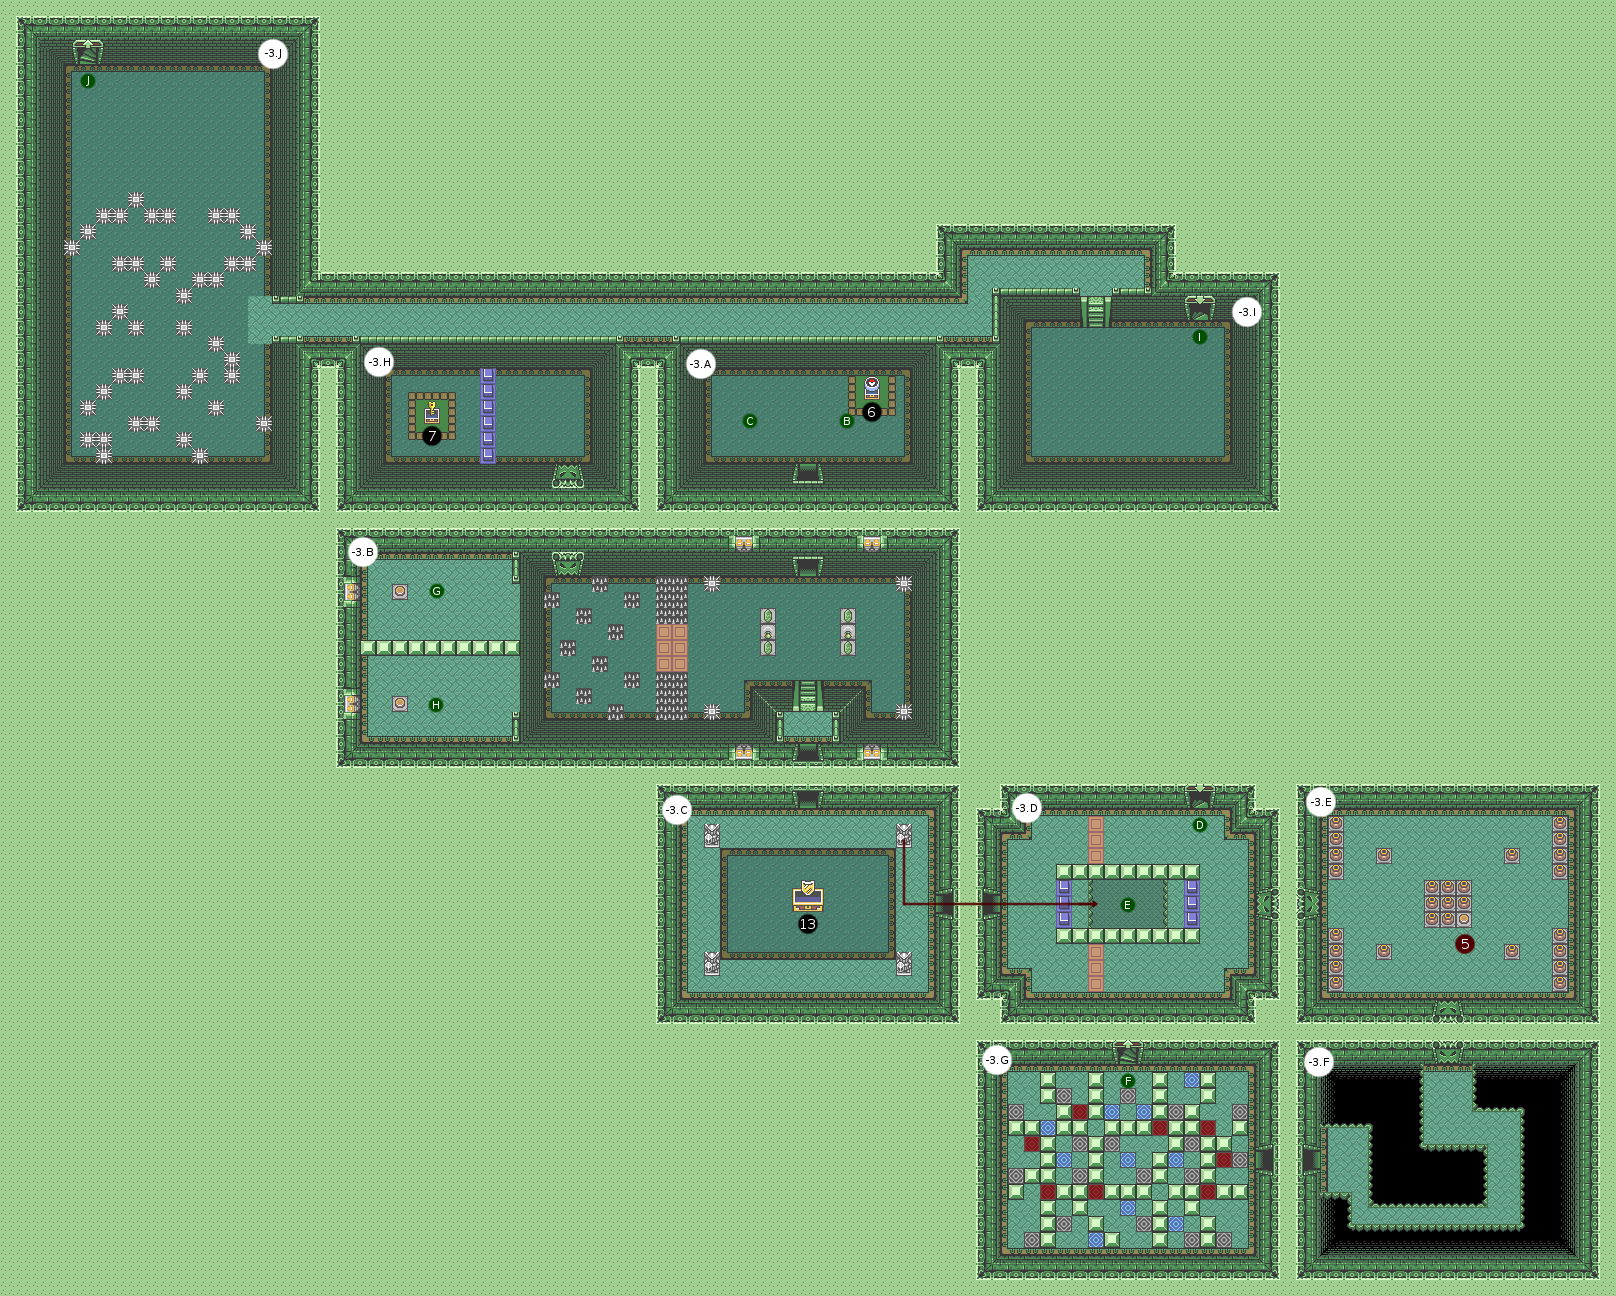 |
| Basement 4 | 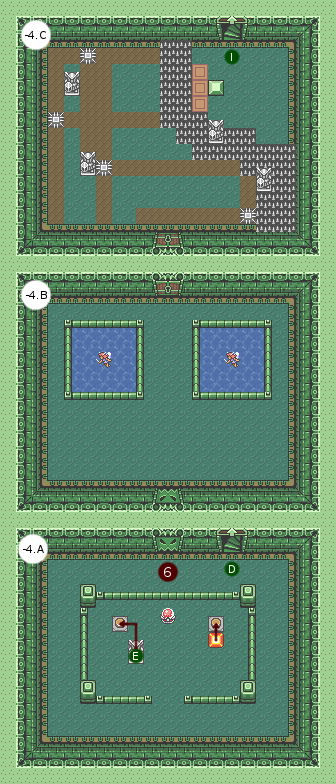 |
| Room | Enemies |
|---|---|
| -4.A | Bubble (x1) |
| -3.A | Tentacle (x4) |
| -3.E | Bubble (x4) |
| -3.F | Red Bulblin (x2) |
| -3.H | Tentacle (x3) |
| -3.J | Red Hardhat Beetle (x4) |
| -2.A | Red Bulblin (x2) |
| -2.C | Helmasaur (x4) |
| -2.J | Blue Hardhat Beetle (x5) |
| -2.K | Blue Hardhat Beetle (x3) |
| -2.L | Red Bulblin (x2) |
| -2.O | Mandible (x4), Bubble (x2) |
| -1.B | Bubble (x2) |
| -1.D | Globul (x4) |
| -1.G | Gibdo (x3) |
| -1.I | Blue Hardhat Beetle (x3) |
| -1.J | Red Hardhat Beetle (x4) |
| -1.L | Bubble (x2) |
| -1.M | Tentacle (x4) |
| -1.N | Skeletor (x2) |
| -1.P | Tentacle (x3) |
| RC.B | Helmasaur (x4) |
| RC.C | Skeletor (x3), Tentacle (x3) |
| RC.D | Mandible (x3) |
| RC.F | Bee Guard (x4) |
| RC.G | Gibdo (x5) |
| RC.I | Globul (x3), Tentacle (x3) |
| RC.L | Red Bulblin (x2) |
| RC.L | BILLY THE RECKLESS (BOSS) |
| RC.O | Red Bulblin (x2) |
| RC.P | Bubble (x2) |
| # | Event |
|---|---|
| 1 | Kill all enemies to open doors |
| 2 | Button to open the way hidden under the skull |
| 3 | Chest appears when all enemies are killed |
| 4 | Chest appears when all enemies are killed |
| 5 | Button to open the door hidden under the skull |
| 6 | Use the statue and a Somaria block on the buttons |
| 7 | Invisible wall only for the hero, do a “S” |
| 8 | Shot blindly an arrow to lower the fence |
| 9 | Button to open the door hidden under the skull |
| 10 | Chest with a timed crystal switch: 8s |
| 11 | Chest appears when all enemies are killed |
| 12 | Weak wall: drop a bomb |
| 13 | Weak wall: drop a bomb |
| 14 | Chest appears when activating the button under the skull |
| 15 | Button to open the door hidden under the skull |
Walkthrough
On the way to the penultimate dungeon. Start by using your grapple to go east. You should know that the two rooms north of the entrance are useless, but you can visit them if the heart tells you. Kill the Helmasaurs, continue through the Southeast Room, kill the enemies to open the doors and activate the switch under the skull at the end of the path. This time, take the northeastern hall from the Helmasaur Hall, take the chest (a Small Key), and then open the door to the left of the entrance. In this room, first walk along the outer wall to the north. At the end you are waiting for a crystal switch that must finish blue. Return to the stairs of this room and go down. Use your grapple to make your way over the trapped ground and then a jump to the end to get to the skull hiding a button that opens the way to the top level fence. Make the opposite way to the stairs, then cross the room on the fence. Kill all enemies to bring up the chest containing the Map, reopen the door, and under one of the skulls is a Small Key. Walk back to the Helmasaur Hall, and take the North Exit. Watch out for the Gibdos, unlock the door on the right and follow the only path available (the one not passing by the laser of the blow) to the giant hole and fall in it.
You fall from two floors. Only one way is available to you, go to the left and push the block. Start by going downstairs: you can recover 100 rupees after you kill the Helmasaurs of this piece. Continue north, and from the blue blocks turn on the crystal switch so that it is red and go out to the north. Here, if you play without sound, you might miss a hint. Follow the path to the index slab and activate it: you are teleported to an identical room next door. Stand out from the south, and turn on the crystal switches in each corner and center so that all turn on at the same time (the one at the top left resets the puzzle). The door opening to the east will give you 50 rupees, but it is towards the west that the continuation takes place. Push the central block again, and go north (the south is a useless cul-de-sac for now). Again a huge hole is waiting for you. Jump in (from the right for more safety at the reception because a horde of Tentacles will welcome you) and open the chest. You now have the Compass.
Continue your way south and you arrive in the room of the Big Chest. Before continuing east, make a small detour via the stairs to activate, in the dark room, the crystal switch: the blue pads must be lowered. Once back to the floor and in the room on the right, four Bubbles are waiting for you, you will have to reach as quickly as possible the button opening the doors: it is at the bottom right of the central square of skulls. Two rooms after, here you are in a new maze of teleporters. Take the first, then the second. At first choice, take the westmost teleporter. You have no choice on two new teleporters and arrive in the more or less central part of the room. There, take the teleporter at the top right and you go to the last staircase. To go back in the other direction, you will just take the teleporter left then the last available.
You go up one floor. Empty the enemies room and turn on the crystal switch, then quickly go west to take the only exit from this room. You can choose to activate the crystal switch with a bomb or arrow to give you extra time. Two rooms north, push the block then turn left. In the huge hole, take either up or down, anyway you will have to start all the way to go also on the side of which you did not jump … To return on the normal way, use the grapple on the skulls. Once both buttons are activated, open the chest in the room that has just become accessible. This Small Key will be very useful soon. From the Big Chest Room, push the statue to the top right into the giant hole in the east ward. Jump down and push the statue on one of the two buttons, put a block of Somaria on the second, then enter the north exit that has just released after making the crystal switch red. In the next room there are two fairies to heal your wounds a bit. Unlock the next door and pay attention to the spades: they follow the brown lines on the ground. Use your grapple at the top right to reach the next staircase.
Follow the only path available on this floor that runs along the ledge on the floor where you were, before falling, and jump down once to the end to reach a room full of pikes (still) and Hardhat Beetles. If you get hit, you can cross the spades directly, it’s a viable shortcut. Go up two more floors and push the block below the one to the east: this will open the door to the south. Cross the flooded hall, you arrive in a room with walls invisible only for you but not for the enemies. You have to move forward while doing an S, then in the room to the east pull an arrow from the door to activate the crystal switch at the end. The button to open the south door is under the skulls at the bottom left. Repeat becoming the red crystal switch for the rest, and continue. For now you have no choice and must continue south. Once in the room with the huge ravine, take the first room on the left to find a Croissant. Retrace your steps and from the Gibdos Hall, go east: the orange studs must be lowered. Jump below and after getting rid of the enemies, put a bomb on the crystal switch and go quickly to the northeast to recover a new Small Key. Follow the only available path east to take a teleporter back to the flooded room. This time you can open the locked room south of the “imprisoned” spades. Follow the narrow path through the abyss, and especially do not rush on the last straight: at the end is the hole of the entrance. Take the stairs (if you want you can also get a Croissant in the room to the east).
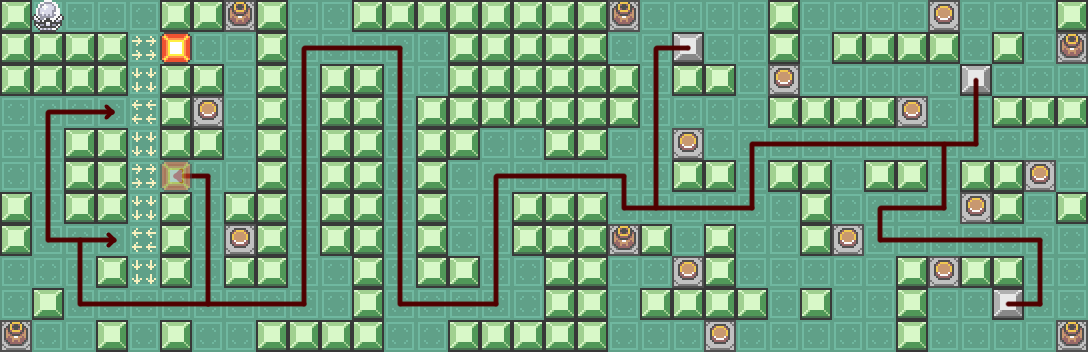
Back on the ground floor, a new enigma with push blocks awaits you. It is quite difficult, so it is advisable to look at the path on the image opposite. It is important to put the block at the top left first, put the Somaria Block in the middle right, then the second block at the bottom left, push the last block next to the Somaria Block to jump at the end the way, to block the end of this path by a Block of Somaria (making the previous one disappear) and allowing you to push one last time the right middle block to the place where previously your Block of Somaria was. So you can turn on the crystal switch and open the door to the west. To avoid stress, you can also go along the flowerbeds of the wall: you do not risk to activate a button with a misplaced jump (only works for the southern flowerbeds). Good luck. Once all the way west, kill both guards to get the Big Key. Remember to place a bomb on the wall to the west to access Piece of Heart #30. Plunge again into the depths of the dungeon to go to the Big Chest and get the Mirror Shield.
Continue your way to the right once your new shield is equipped, and return to the room where the spears were imprisoned (from the room east of the Mirror Shield, you have to go down and follow the only path). Leave this time the crystal switch activated in blue, go south to the long room with a ravine in the middle, then go all the way to the west and use your grapple to go through this entrance. Thanks to your shield, you can now go beyond the laser. You can prevent the rays from touching you even with the sword unsheathed, the direction of the shield remains the front one (to avoid being touched, you have to load your sword to the north and go this way until you reach the radius) . At the end of the path, on the platform, launch a bomb between the second and third skull. You are now back in the ravine room, but from the south. Head east, lift the skull in the next room and activate the button: this brings up a chest with a Small Key. Now you have to go get the Boss Key, which is behind a double lock (you have to see the room we are talking about …). For that, go back to the giant hole of the entrance (at the end of the small narrow path), and plunge again in the abyss for one last time. Go all the way back to the Big Chest room, and make your way back as when you had to activate the two buttons on each side of a giant hole. But instead of heading to the hole, go east (the orange studs must stay down all the time this time). Then walk back in the opposite direction to all the times you passed through these rooms, push the block south and you can access the two locked doors to the west. You get the Boss Key. Go back to the ground floor and you can open the boss’s door after the big block room, the eye stops pulling when you open the door.
Boss: Billy the Reckless
This is the most useless boss in the history of video games. It just gets you going, you do not have to move - just hit the sword at regular intervals to get rid of it. Nevertheless, he entrusts you with a Heart Container at his death. And you will need it because just after going down the stairs …
Boss: Agahnim
The fight is essentially the same as the Dungeon 5: it sends fireballs and you have to send them back. The problem is that here after six shots (be careful, the sixth shot he returns the attack, put yourself at a safe distance), he uses one or two doubles that you can destroy with a sword stroke (but beware: they do not fear attack referrals). You have to find the right one, namely the one that is not transparent). The balls will quickly increase in number and speed, the fairies found on the way will not be too much … 8 new shots will be needed to shoot it. He summons his doubles when he comes to take an attack, so do not forget to lose some time to disable them with a sword.
Once defeated, he releases your favorite enemy Ganon who teleports you directly into his dungeon. You can, however, come out and use the vortex to return easily. Feel free to hear from Billy the Reckless in our exclusive interview (only in french ATM).