Maps and useful informations
| Floor | Map |
|---|---|
| 3rd Floor | 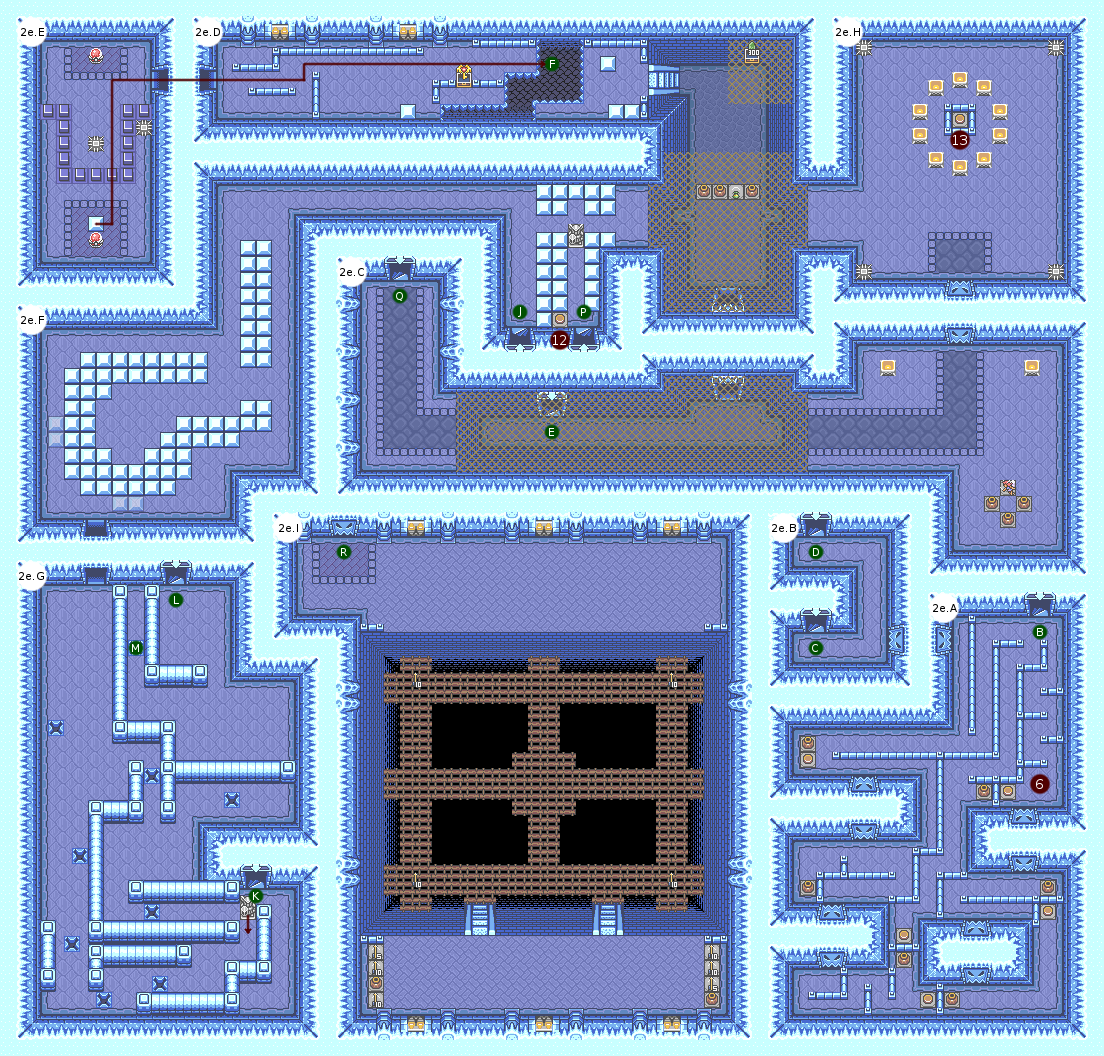 |
| 2nd Floor | 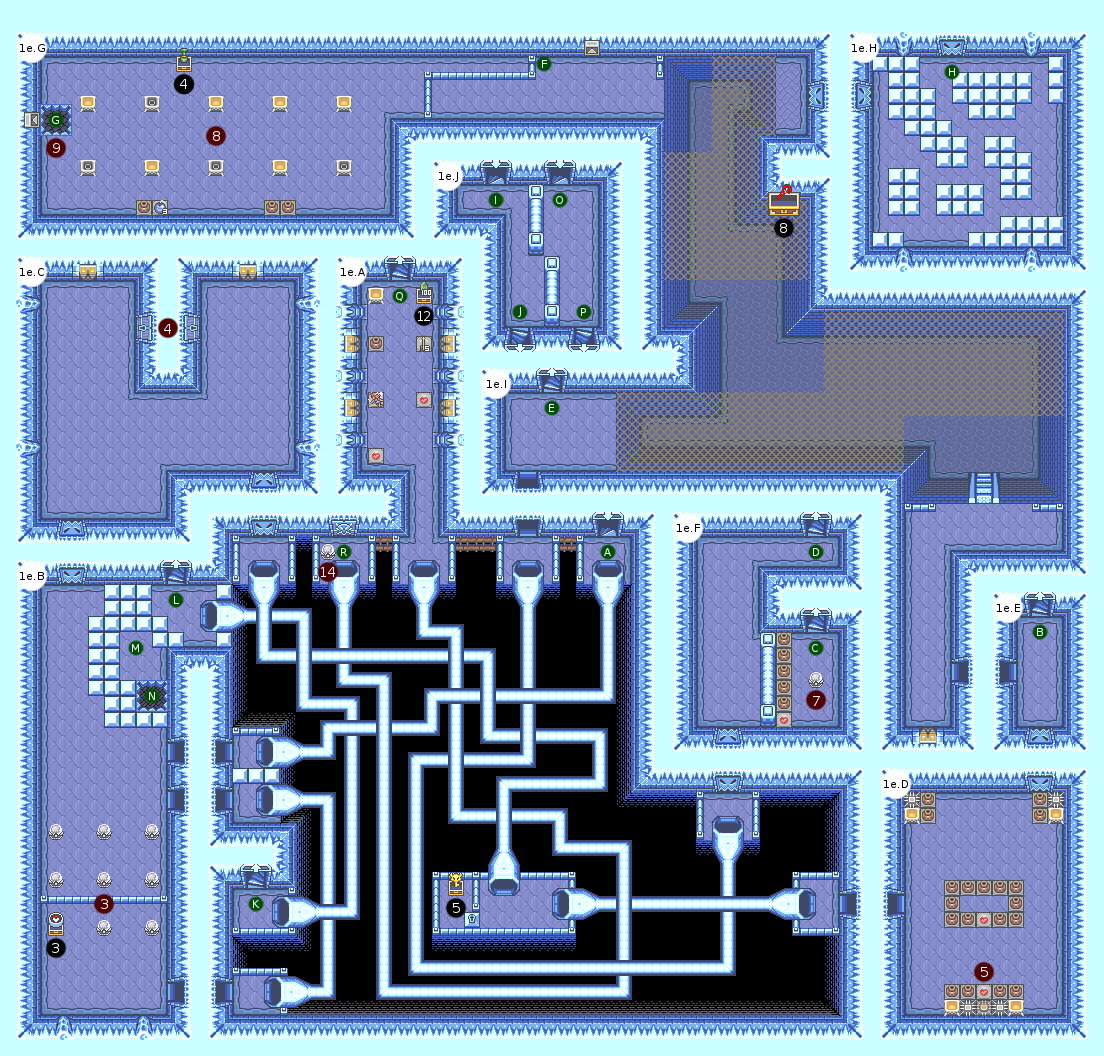 |
| 1st Floor | 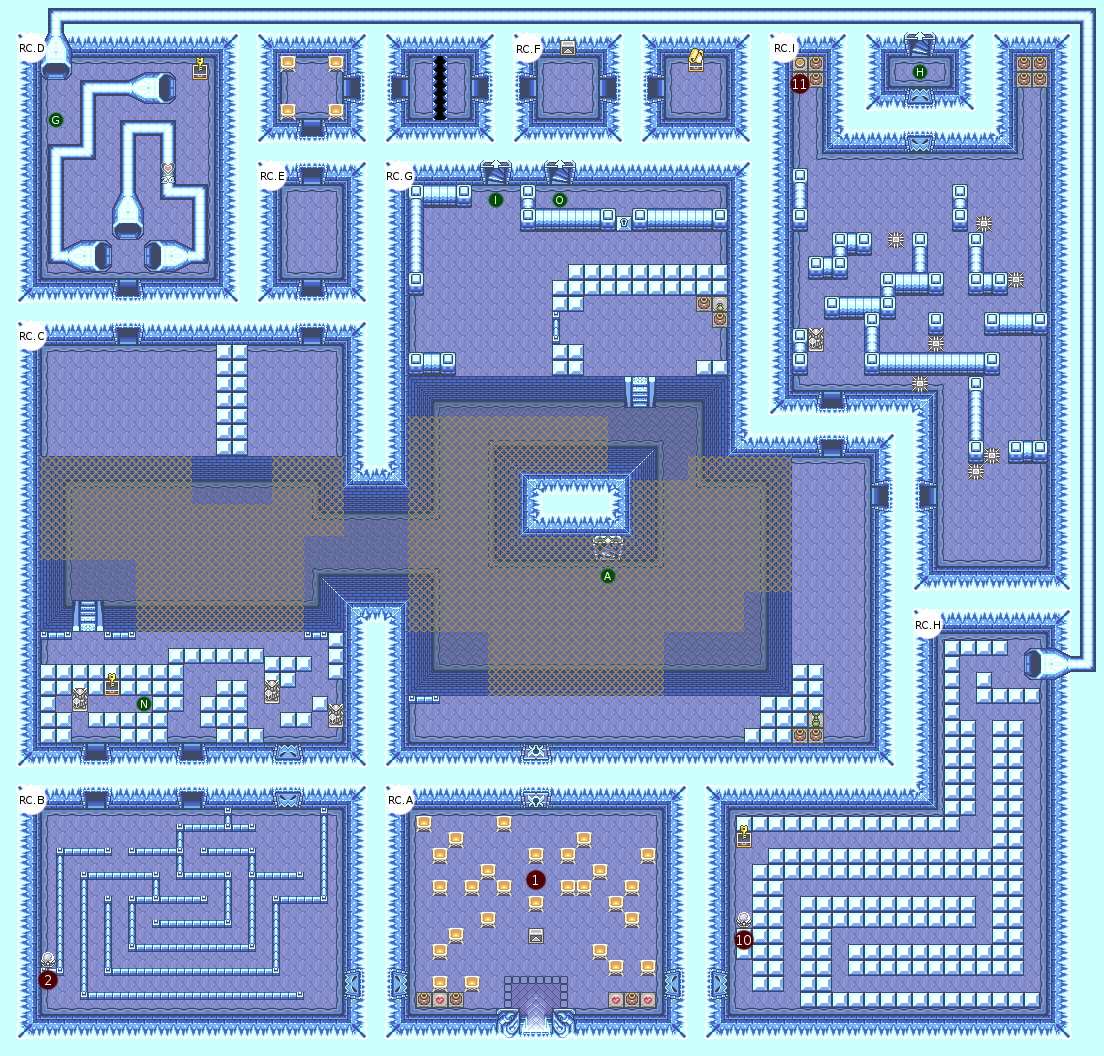 |
| Room | Enemies |
|---|---|
| 1F.A | Blue Duck Soldier (x1), Green Duck Soldier (x1) |
| 1F.C | Blue Duck Soldier (x1), Green Duck Soldier (x1) |
| 1F.E | Green Duck Soldier (x1) |
| 1F.F | Lizalfos (x1) |
| 1F.G | Blue Duck Soldier (x1), Red Duck Soldier (x1) |
| 1F.H | Lizalfos (x3) |
| 2F.B | Lizalfos (x1), Green Duck Soldier (x1), Red Duck Soldier (x1) |
| 2F.C | Blue Duck Soldier (x4) |
| 2F.G | Lizalfos (x1), Blue Duck Soldier (x1) |
| 2F.H | Lizalfos (x6) |
| 2F.I | Blue Duck Soldier (x1), Red Duck Soldier (x2) |
| 3F.A | Red Hardhat Beetle (x1), Blue Hardhat Beetle (x2) |
| 3F.C | Lizalfos (x3) |
| 3F.F | Red Duck Soldier (x2) |
| 3F.G | Red Hardhat Beetle (x3), Blue Hardhat Beetle (x2), Lizalfos (x2) |
| 3F.H | Lizalfos (x2) |
| 3F.I | GELIDRAK (BOSS) |
| # | Event |
|---|---|
| 1 | Follow the torches hints |
| 2 | Timed crystal: 10s |
| 3 | Activate crystal switches on a precise order |
| 4 | Hidden enemy inside locked doors |
| 5 | Hidden button switch under the middle spike |
| 6 | Maze of timed doors (12s, 4s, 15s, 4s, 12s) |
| 7 | Open the south door of the room |
| 8 | Hint stone appears when all torches are lit |
| 9 | Drop a bomb in front of the hint stone |
| 10 | Time crystal: 15s |
| 11 | Push the statue onto the north-west button |
| 12 | Time button to open path on the east button: 8s |
| 13 | Open the south door [Requires: Somaria] |
| 14 | Open shortcuts of the room |
Walkthrough
We begin the dungeon with a room similar to the hunt for signs. Follow the directions after killing the enemies. Be careful, they start to be tough, I hope you did the Skyward Tower because the fighting will be much more difficult in the opposite case.
List of indications: left, up, right, down, right, down, left, up, right, down, left, down, right, up, left, up, right, down, right, down, right, up, left, bottom, left, up, left. You can also consult the reading order on the image below.
Continue on the only available path, to the left. In this room, place a bomb on the crystal switch on the left and go up through the central door to the north. Pull the left statue to the south and wait for the door to open, then go back to the previous room. This time go directly to the north central passage without activating the switch: you have access to the northern part of this room. Start by going northwest. Two tips are available to you. Take the right / top one to find the Piece of Heart #24, then the left pipe to take the chest. You get a Small Key. Return to the previous room with the fence and go this time to the northeast. At the end of the path is the Map. The hint stone indicates the order of activation of crystal switches:
4 7 2
6 1 8
  3 5
Go back to the fence and jump below, then go east to find an entrance under the fence of the next room. Go up, and you will be in front of a pipe. Follow it to get to the famous crystal switches. Activate them according to the diagram indicated above. I advise against the use of the sword, a false movement can quickly happen, even more if you are not in front of the switch, the sword making an arc can make it all miss. Use a straight tool such as the grapple or the boomerang for more security. The chest just below contains the Compass. Activation of the crystal switches opens the door to the north. Unlock the door that is useless and chained directly with sword / boomerang: a duck will go out furiously. The south-east door unlocks once the hunt is over, and we’re gone in a pipe. The chest taunts you, you will not be able to have it until later, then continue in the room in the east and raise the skull center in the south to release a pique which hid a button. I advise before to clear the way so that its movement is longer, giving you time to stroll at leisure. Each one his technique, you can also break absolutely all skulls and make this piece a giant meat grinder. In any case, go out to the north and go up a new floor.
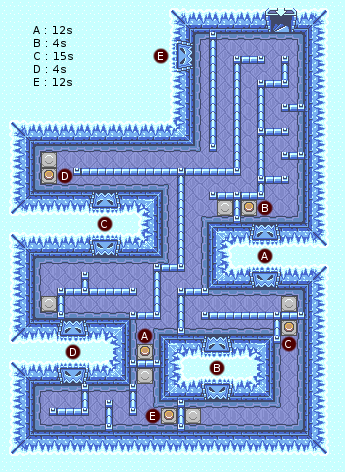
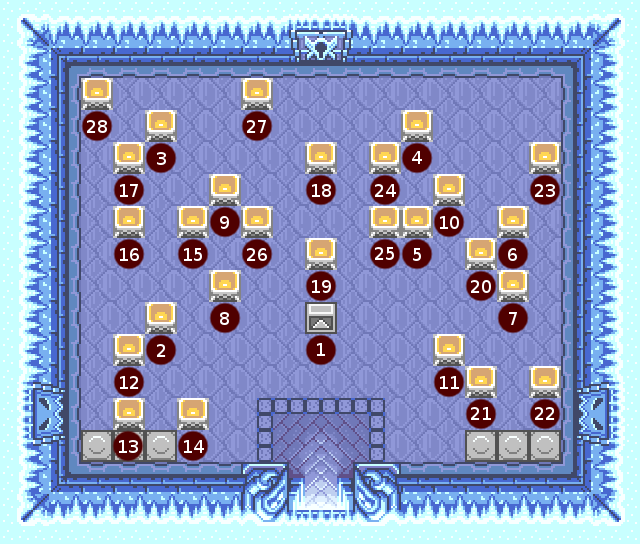
Here is one of the most stressful parts for timed-stress people. You have the order of activation on the image. Start by lifting all the skulls possible, without operating the switches for as much. First activate the one that is the most southerly (time: 12s), then go through the small labyrinth to the open door by actuating the switch next to it (time: 4s). Do not waste time and rush into this new passage, do not waste time with the skull on the other side of the door, it is useless. Go all the way to discover a new button under a skull. Go back in the opposite direction after having activated (time: 15s), activate the switch near this new door (skull bottom if you have not discovered, time: 4s), then go not on the left but on the right because once again the skull is a lure, then at the end of the path break the skull down to activate the last button (time: 12s). Go to the last door that has just opened, and you have come out of this infernal room. If you miss a single trip, you will have to start from the beginning. Once the door is over, you can return to the room without the exit closing.
First take the south staircase to activate the crystal switch, then the north to exit in the lower floor from the south. Here is the mix of pipes. Once out of the pipe, do not go on the fence (it’s a cul-de-sac) and go up to the second floor. Navigate in the lower stratum of this floor to go north, and use your grapple from the edge of the giant hole to cross it to the west. In this room where two spades are going to be particularly annoying, you will have to report a block to the hole you have just crossed. A fairly simple method is to put the block right behind the first line of blue studs, stay on that line, and send the boomerang to turn on / off the crystal switch until the two spades are trapped and do not move anymore. . You can continue your merry way quietly. Push it to the north edge of the hole, then jump after it. So you land on the block, and can reach the left portion of this room without problems. Light the torches you discover a slab index indicating you must put a bomb right in front of her. The chest contains a Large Magic Jar. So jump in the hole in front of the hint stone to arrive … In the first room to the pipes, where there was the Piece of Heart! But now you have to go all the way up this floor to get to the room east of the entrance. After eliminating the Lizalfos that reign in this room, put a bomb on the crystal switch and follow the path to the entrance, not without having recovered the Small Key next to the crystal switch before. You have fifteen seconds to make the trip, which is more than enough.
Repeat the technique used earlier to get to the second floor through the west room (so bomb on the crystal switch, middle door, pull the statue, go through the door that opens, and go behind the statue then fall from the fence and go up one floor, go north and kill the soldiers to return to the brothel of pipes). You arrive again on the platform containing the chest that could not be recovered earlier because of the locked block. It contains the Big Key. Go back to the entrance (either by turning back, or by doing all the way of earlier, as you want … I still advise to turn back: faster). Open the north door then go north-east. You will have to shoot and push the statue to its place, north of the room, but as it would be too simple to do it directly, it will take a huge detour full of pikes. Start by pushing it south and slightly east. Once it is in front of the pungent ball, push it to the right (or pull it, whichever suits you the most, the important thing being that you are on the other side than the spades). Once arrived at the corner, go down, watch the passage with the horizontal spike, then go to the corridor on the right up your statue, follow the only path available, usually it is the one that goes through the path of the spades. You will have to go through the path on the right with the two pikes that cross to be able to maneuver the statue sufficiently and thus bring it to the west. For the passage with the cross of the spades, there are two schools: the very prudent or the bourrine. You choose the style that suits you best, but the case remains very effective for a loss of life sum. The button is under the most north-west skull of the room. Go up one floor and you arrive in front of the “mini-boss”, an ambush of Lizalfos this time. Six individuals are to be killed.
Exit from the west and take the Cane of Somaria. With this item, you can now walk all around Hyrule (except two caves that require the next item but you can eat thanks to the grappling hook). Jump down and take the stairs a little further. You come back on the path you had made to drop the block from the second to the first floor. Go back to this point and use your Cane of Somaria to make a block to the right of the chest. Use this newly created block as an anchor for the grappling hook, then push it to the left and open the chest: you get the Boss Key. Return now to the dungeon entrance, by the way you want. Jump below the north hall, climb the stairs a little higher and from the wall on the left, use the Cane of Somaria to create a block for your grapple. Go back once again to the entrance, making the detour to the left, and from the fence of the hall north of the entrance use the grapple on your block. Then go up two floors.
On your right you can pick up 300 rupees using the grapple to the north on the fence with the four skulls lined up. Then use them to return (otherwise it will be necessary to retype all the way with the Cane of Somaria from the entrance, etc.). The room still on the right with torches in circle is uninteresting for now, so head west. Go through the south passage and the blocks should disappear (there is an invisible switch on each side). In the next room beware of the treacherous holes: the enemies will like to make you fall, and you will be good for a new journey from the entrance … Go around the room from the west, you will arrive at a statue that you must pull south, retrace your steps and jump over the hole that takes a full corridor despite its narrowness to access the stairs that blocked the statue.
You are back in the pipe room. Only one way is offered to you, so not really the choice. You go up again in the hall with holes, but this time a single hole blocks the road, or rather you bar the cul-de-sac. Fall in this hole and in the next. You can finally open the chest that taunts you from the beginning of the dungeon behind the statue west of the entrance. It contains a Small Key. Repeat the maneuver to go north of the wire room above the entrance via the Cane of Somaria, but this time open the locked block and take the stairs thus released. Climb two floors again, and activate the button when you arrive. This has the effect of removing one of the torches but only momentarily, namely for eight seconds, so you must hurry to use the Cane of Somaria to activate the released switch. Beware of Lizalfos and spades in your haste. You can also clear the field at first and then do the maneuver. Follow the path thus released. The floor below awaits you with a chest of 100 rupees, and a crystal switch that opens a royal shortcut to all parts of the dungeon. You are in front of the boss’s door.
Boss: Gelidrak
Gelidrak is a mix between Drakomos and the Phoenix. It flies around the room and sends you balls of flames. It has two weak points, the first only making it vulnerable to attacks on the second: you must first shoot an arrow in his tail, which has the effect of making his head vulnerable to attacks (I can not advise that to attack suddenly his head by sprinting or charged shots to be invincible when he wakes). It appears when you want to climb one of the stairs. You should know that while he is vulnerable, his body does not attack you if you touch him, so you can cross it without constraint (no need to waste time bypassing it, especially since it is a beautiful beast) . The less HP he has, the more he throws flames, so that he can send from a dozen to thirty flames. He has 24 life points, so that’s a simple shot to give to the sword (first name) on his head. If you miss arrows, there are reserves in the skulls on the promontory to the south. If you still run out of arrows, as in the Phoenix fight, you will have ammo that will appear at every corner of the boss’s room (each ammo will serve you 10 arrows).
Once defeated, recover the Heart Container and let the wise old man speak with you. It explains your next destination, but it will not be without a maze before.