Maps and useful informations
| Floor | Map |
|---|---|
| 1st Floor |  |
| Basement 1 |  |
| Room | Enemies |
|---|---|
| B1.B | Bubble (x1) |
| B1.C | Skeletor (x4) |
| B1.D | Skeletor (x1) |
| B1.E | Skeletor (x1) |
| B1.F | Phoenix (BOSS) |
| 1F.A | Tentacle (x6), Skeletor (x2), Globul (x1) |
| 1F.B | Globul (x1), Skeletor (x1) |
| 1F.C | Tentacle (x5) |
| 1F.D | Skeletor (x1) |
| 1F.F | Khotor (MINI-BOSS) |
| 1F.H | Skeletor (x1), Globul (x1) |
| # | Event |
|---|---|
| 1 | Open the breach near the chest |
| 2 | Key possessed by a Skeletor |
| 3 | Shoot the eye of the statue (twice, once for each door) |
| 4 | Pegasus Boots required |
| 5 | Open north wall (timed, Pegasus Boot required) |
| 6 | Open north wall |
Walkthrough
Go straight into the room on the left once entered the dungeon. Activate the crystal switch, and thanks to bomb flowers, go to the other side of the studs by sending it from the blue pads, then go up as soon as you see a branch: the entrance to the stairs is blocked by the blue pads. Lift the two vases, under one of them is a switch that opens the passage to the suite. Retrace your way to the junction, take the stairs down a floor, you will find a chest and a clue. This chest contains 5 arrows, keep them safe if you have not had time to recover others on the way to the dungeon, you will need 4 in not so long. Go up one floor, then climb the stairs to the left. A chest containing 5 rupees is there. Jump from the ledge that you released through the switch earlier, and follow the only possible passage.
Under the Savior-Husband will always find an arrow, if you miss it you know where to come. Be careful to throw bombs off, they explode on the low walls. The fourth pot contains a Small Key. Activate the crystal switch to lower the blue pads, then choose either use the bombs or an arrow to redo the blue pads while you’re on it. Then send an arrow and go quickly to the right as soon as the arrow is drawn to find you on the orange studs as they are down: they will go back at the same time, freeing access to the stairs. The Skeletor on the upper platform has a Small Key. Come down from this platform and go to the stairs at the top left of the room (you have to activate the switch from the orange pads, and to return you will need an arrow). He will take you to a small room with the Dungeon Map.
Turn back and go under the platform where the Skeletor is. As you can see on the map, you can access Piece of Heart #05 by walking around the bottom and lifting a pot (watch the Action button to see when it goes to “Lift”), then go back down the hill. the right wall. You arrive at a chest containing a third Small Key. By pushing the blocks (the one from the top to the right, the one from the left to the bottom and the one from the right to the right) you can go back to the entrance. You will use your three keys at once: go straight up and remove the locked block, go through the locked door (westward), and still the second door locked (northward). In the next room you have two Cyclops statues. Uncheck two arrows in each one, alternating between the statue on the right and the one on the left to reveal a staircase to the north and then a door on the east. Go east first: you get the Big Key of the dungeon. Then go down the stairs discovered a few seconds before.
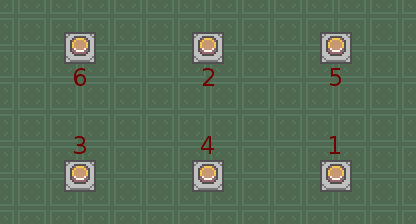
You are now in a very big room. First go straight south to get the Compass in a chest, then go to the next intersection next to the jar, behind the two rows of different colored blocks. The orange pads must be lowered. Uncheck an arrow and go down immediately: the orange studs get up while you’re on it. You can now move to the next room with the Big Key. In this room, follow the figures in the image opposite, or the arrow in the overall map. If no image is displayed, here is the order to follow:
6 2 5

3 4 1
Activating the buttons in the right order gives you access to the Boss Key. To retrieve it, head north and walk along the wall on the right. Once in possession of this key, leave this floor to the north. You arrive in the mini-boss room.
Mini-Boss: Khotor
Khotor is not so dangerous. Watch his plague, and when it is shorten attack him with the sword. He also fears vase throwing and arrows. Six shots will be needed, knowing that the sword for this particular enemy is doing as much damage as a mudshot. The arrows are quite inefficient: the damage is halved on him, so you’ll need twelve arrows to shoot him down if you only use the bow.
Going to the boss
A fairy rewards you for your victory, take it and head east. A Grand Chest is offered to you, containing the Pegasus Boots. Depending on the version of the game, you do not have to equip it to run: press the space bar or the action key (used to speak) to light up like lightning. This technique makes you generally invincible, and you do as much damage as a cyclone attack, it is very important for bosses. Jump into the hole, you land north of the huge hall on the lower floor. Head south, and turn on the crystal switch to the west to lower the orange pads before returning to the jar. This time, take the jar and discard it to avoid any discomfort. On the same line of tiles as the jar, post against the right wall to give you more room to maneuver, face west (the crystal switch). Shoot an arrow, and run immediately south. Do not hesitate to start pressing down while animating the arrow, it will be pulled in the right direction anyway. As soon as Link can move, use the Pegasus Boots. You should bounce off the south wall when the orange studs come up. The way is now free to open the second chest: the Big Wallet (can contain up to 300 rupees).
Go back to the entrance, for that use the bombs on the crystal switch when you are on the blue pads (or a sword stroke placed at the pixel can do the trick), then take the stairs to north of the room. Retract the rooms that were locked in the opposite direction, and you’re back to where you started. You can now explore the northern part of this floor. Turn on the switch behind the orange studs, as the blue studs should be down for the next puzzle. Then kill the enemies on the road north of the entrance so as not to be embarrassed, then while running go on the switch on the ground. It will open a passage to the north (the key is speed), normally without interrupting your run. Avoid bouncing, this would save you time, so when you get to the end of each straight line, use the arrow keys to the next direction. This will have the effect of stopping net Link’s race. This timed pass being eight seconds, a single race (without a rebound against the wall) may be enough to finish it, but you can do up to three races if you want to play safety. You arrive on the last puzzle, but first of all get the last chest containing 20 rupees: you will need it soon. To turn back, under the jar you have a button that constantly opens the way to the north (you avoid retyping the race).
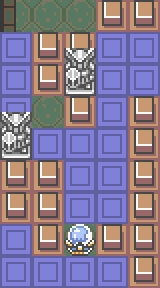
Here, you must be able to reach the crystal switch from the passage between the blue and orange pads next to the hole. To do this, move the left statue to the left, but to get there you must first move the statue on the right: the image opposite represents the intermediate step and you have the arrows on the global map to better anticipate the movements, but for a textual description, here it is: first you have to pull the statue on the right up three plots, then a notch on the left, then you have to pull a notch the statue of left, push it one more step up, then place it all to the left. You will be able to pass thanks to the small passage without stud in this mini labyrinth (one arrives at the configuration of the image). The problem is that the statue on the right is now on the path of the arrow, so it must be brought back to its original position. Once done, place yourself under the third orange pad from the right, and shoot an arrow to the south. The switch activates, leaving you access to the Boss. So jump in the hole and follow the only path available while recovering the fairies en route. Stand in the center of the boss room to make it appear.
Boss: Phoenix
It is an opponent a little more difficult than the first Boss because of his agility. He flies erratically in the room, and he must be shot arrows in the legs. Ammunition appears along the path around the room, the catch is that these bridges collapse as soon as you walk. Only the path to the south never collapses. Remember that running makes you temporarily invincible, allowing you to cross enemies and bosses without taking any damage (but beware of rebounds on the walls!). Ammunition appears in sets of four, one at each “corner” of the road. The Phoenix can also send you fireballs ending in an incandescent pool. Eight arrows will eventually burn the wings of this doomed bird, giving you a new Heart Container and opening access to a new Solarus Child (the door is to the south).