Maps and useful informations
| Floor | Map |
|---|---|
| 5th Floor |  |
| 4th Floor |  |
| 3rd Floor |  |
| 2nd Floor |  |
| 1st Floor | 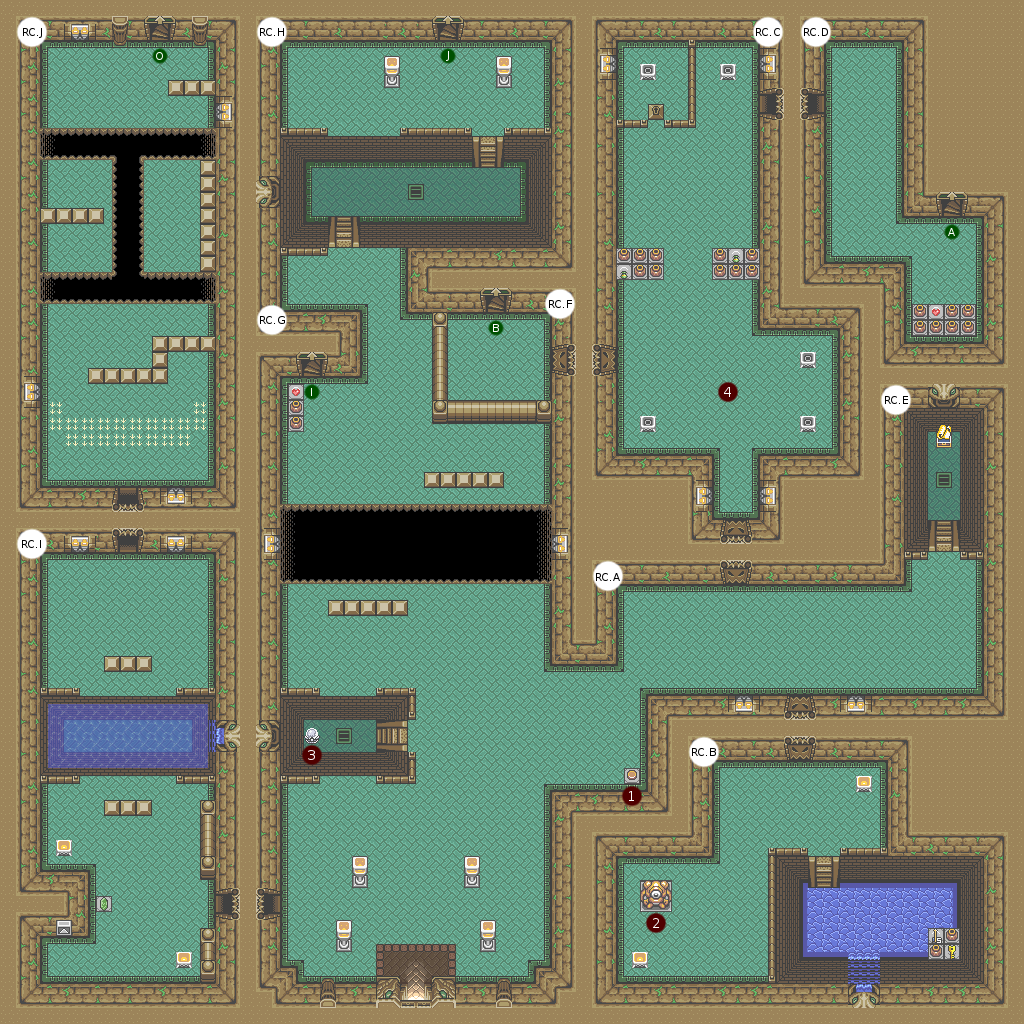 |
| Room | Enemies |
|---|---|
| 1F.A | Mandible (x2), Bee Guard (x1) |
| 1F.B | Mandible (x1), Bubble (x1) |
| 1F.C | Bee Guard (x1), Bubble (x1) |
| 1F.D | Mandible (x1) |
| 1F.H | Mandible (x1) |
| 1F.I | Mandible (x1) |
| 1F.J | Bee Guard (x1) |
| 2F.A | Blue Bullblin (x6) |
| 2F.C | Mandible (x2), Bee Guard (x2), Bubble (x1) |
| 2F.D | Mandible (x1), Bee Guard (x1), Bubble (x1) |
| 3F.A | Tentacle (x9), Bee Guard (x1) |
| 3F.C | Mandible (x1) |
| 3F.D | Mandible (x1), Bee Guard (x1) |
| 3F.E | Bee Guard (x1) |
| 4F.A | Mandible (x1), Bee Guard (x1), Bubble (x2) |
| 4F.B | Mowatulla (MINI-BOSS) |
| 4F.D | Bee Guard (x2) |
| 4F.F | Master Arbror (BOSS) |
| # | Event |
|---|---|
| 1 | Open east door below |
| 2 | Empty water in the entrance |
| 3 | Open east door above |
| 4 | Light up every torches in a row |
| 5 | Empty water to access the Map |
| 6 | Open path to the Compass |
| 7 | Create a shortcut to the room entrance |
| 8 | Open path to Piece of Heart |
| 9 | Empty south basin |
| 10 | Create a shortcut to the west |
| 11 | Empty the basin located north of the entrance gulf |
| 12 | Open north door |
| 13 | Unlock hidden chest [Somaria Cane required] |
Walkthrough
You are now in the den of Master Arbror, a dungeon that begins to become more complex compared to previous ones. It consists of five floors (actually four, the latter provides no enigma and mainly serves as a transition), including one completely immersed in the dark and labyrinthine. Fun in perspective!
Start by exploring the room where you arrived. You are quickly more or less restricted in your exploration possibilities: all doors are closed or water / vacuum prevents you from progressing. Lift the only available skull in the entrance hall to discover a button that opens the door just to the right. Enroll in this new room and go down into the muddy pit (beware of Bubble): lift the skull at the bottom right of the square to retrieve a Small Key, go up and shoot an arrow in the eye of the statue to empty the water in the basin of the entrance. You now have access to the crystal switch. This opens the way to the next room where you have to go.
Beware of Bubble, which will never stop tormenting you. In this room, you should turn on all torches in less than 8 seconds. To do this, empty first any possible obstacle on your way, namely all the skulls, and start with the torch in the small narrow room, then follow clockwise. Do not forget to run between the first two and the last three, and use a directional pad to stop your run without banging against a wall, saving you precious seconds. Even if you get hit by the Bubble mid-race, keep calm and everything should succeed. This opens the door on the left, but before going explore the north-east exit. Climb to the first floor and kill all the enemies to unlock access to the room to the south with the two cyclops statues. You are used to now, plant an arrow in each of them to empty the water that prevented you from accessing the trunk next to the torch room.
Return to the torch room, make a small detour through the pond that you have just emptied to the east, and recover the Map, then go into the room you opened with the torch lighting. It is the link with the main room on the first floor. Follow the only path of this room (you can first destroy the skulls in front of the peaks, but this will be discouraged later) to arrive at a choice between a path surrounded by low walls leading you to full teleporters or follow the outside passage . Follow the outside passage. As you can see, the skull next to the chest opens the way to the safe, while the chest at the end of the path opens a shortcut to the stairs taken a few moments ago. Now that the passage is open, return to the level of the road surrounded by low walls, and engulf you in the teleporters. By going all the time on the teleporter on the left, you arrive safely, but a shortcut allows you to dodge a few: count two teleports and take the teleporter on the right instead of going to the left. All you have to do is jump into the last teleporter on the left to access the corridor at the end of which is the Compass. Retrace your steps, enter the only teleporter accessible to return to the beginning of the path. Exit the room by the stairs to the north, next to the button opening the secret passage. You go to the second floor, the one plunged into darkness.
Use the map to find your way, but although this maze may seem disturbing at first glance, it is actually quite simple to master. For starters, we will recover the Piece of Heart immediately. To do this, walk along the right wall until you come to a place where there are five parallel paths going to the left. It should be known that on these five paths, the three of the top are cul-de-sac. So take the second from the bottom (the bottom one will be used a little later), and follow the only path available despite all small impasses. The rule of labyrinths (always follow the same wall) can apply on this one. Try to always go down and to the left, in priority on the left if you have the opportunity. After a while, you will come to the skull that interests us and opens the way to the Piece of Heart. Retrace your way to the entrance (so all in all: always go up and to the right following the wall glued to the skull to the five paths, then follow the right wall to the top). Now follow the big left wall until you come across a door. In front of this door, a passage between the low walls: follow it to reach Piece of Heart #09.
Go back to the big wall (no need to go to the north room, it’s a cul-de-sac) and follow it until you reach the stairs leading down. Light, finally, all this darkness became a little oppressive. Follow the corridor and shoot in the eye of each of the statues. The one on the right empties the basin giving you a Small Key, the left opens the shortcut to the “main” side of the room. Return to the labyrinth of the second floor, if possible by the first staircase you have taken to get there (next to the shortcut button, north of the main room). Return to the junction of the five parallel paths and take the one at the bottom. Once again, only one path will be effective, so you will not be able to lose yourself (always walk the same wall if you have doubts), as soon as you meet the main wall of the room, walk up to arrive at the locked door. Open it, and lay a bomb on the cracked ground on the left. As for the first time you did this, if you find the bomb explosion time too long, stick to the wall and throw it to the cracked ground, it will explode in the right place. Jump in the hole, and recover the Big Key. Jump the cornice, go up to the second floor, and this time out the door to the southeast (in front of the stairs by which you arrive). Continue your way taking care of the enemies, and take the stairs to the left of the last room to go to the third floor. Follow the only path available, taking care of the Bubble and the Spades to get to the door of the mini-boss.
Mini-Boss: Mowatulla
Mowatulla is a mini boss quite hard to reach: only his head fears your shots. Be careful, because he spits his offspring quite often, and his jumps have (for now) no shadow, it is quite difficult to gauge its distance. Consider these jumps as quick moves on the ground, to help you see a possible dodge. You can run on him (he is very vulnerable when he lets go of his cubs because he stops, and with your race you are invincible in addition to double the damage). A technique is also to corner him on one side, being lower than him, and wait for him to jump: a well placed arrow will cut him in his tracks and it is possible to chained him with other arrows. You will need eight sword shots to kill him (so 4 arrows and 4 charges).
Going to the boss
As usual, a fairy will reward your efforts, and access to the room on the right opens. Go to the hole and jump happily, because you fall again in the dark floor, at the Big Chest. Open it (the entrance to access it is at the top of the room) and you get the Hookshot. These expanses of emptiness and water will no longer be an obstacle to you! Exit on the left (the switch is under the skull to the southwest), you’re back in the huge labyrinth that you should begin to know. Walk along the south wall until you reach the switch that opened you to Piece of Heart #09. Return to the entrance (for the most impatient, save & reload) dungeon. So: exit north of the labyrinth, then shortcut to the stairs with the switch activated much earlier, and you’re back on the ground floor.
We will begin by crossing the void that is in front of the main entrance. Use the grapple on the blocks in front, but you will notice that the path is blocked by water. Go to the upper floor. Push the first block to the right, then the second to the bottom, explode the last block and shoot into the statue. The water is now emptied. Return to this pool, and cross again to climb to the top floor from the northernmost exit of this floor. You notice here a button surrounded by low wall on the right, and a typical chest floor to appear. Do not worry, we’ll come back to it, but much later (after the seventh dungeon). For the moment, continue your climb of three more stages, until you leave the dungeon in fact. You are now on the treetops, take Piece of Heart #10 and jump into the hole on the left. You land next to Boss Key chest on the second floor. All the elements are now available to go beating Master Arbror. The button to open the door is on the skull to the northwest. Go back to the entrance (go down two floors, then south), and finally enter the room on the left, available from the beginning but useless until then.
Cross the expanse of water thanks to the grapple, in the next room you can fly over the trapped slabs thanks to your grapple, then clear your way (platform of right, then of left and to finish that of the top) over the void to access the last staircase of this floor. Note that it is useless to fall into the hole of the first floor. Continue climbing until you reach the boss’s door. Do not fall on the second floor, you should go back to the labyrinth (you remember the door that led to a cul-de-sac - that’s where you would be).
Boss: Master Arbror
Master Arbror is a particularly difficult boss if we do not fight fast enough on him. Its principle is very simple: roots / arms come out of the ground, and will do everything to rot your life. So you have to immobilize them with the grappling hook, but be careful: even if you immobilize them for the first time, they will only be immobilized for a short period of time (as for any enemy), and they do not remain all the time. time in the open air. At first, it only has three hands coming out of the ground, once they are all immobilized, the main trunk becomes vulnerable to your attacks. The problem is that the number of roots to be immobilized increases as his health decreases. Given that he must be given eight shots to kill him, I advise first to immobilize his three hands and give him three strokes of swords. With the health that remains, he will launch his maximum of 6 hands, but they will be relatively slow (because the speed of the hands also increases as his life decreases). As soon as his six hands are immobilized, attack him as much as possible and harass him (never let go of the high key because there is a recoil at each shot), and you should kill him at once. If you fail, get ready to live hell on Earth…
Another technique is to shoot him directly at its first opening four arrows: the size of the boss will make all arrows to touch him despite his mini lapse of time invincibility, and you will kill him without trouble. Stuff the arrow button and everything will be fine.
Once defeated, you can recover the Heart Container and access the third Child of Solarus. For a quick recap, you should have at this stage of the adventure 9 complete hearts and two Pieces of Heart.