Maps and useful informations
| Floor | Map |
|---|---|
| 2nd Floor | 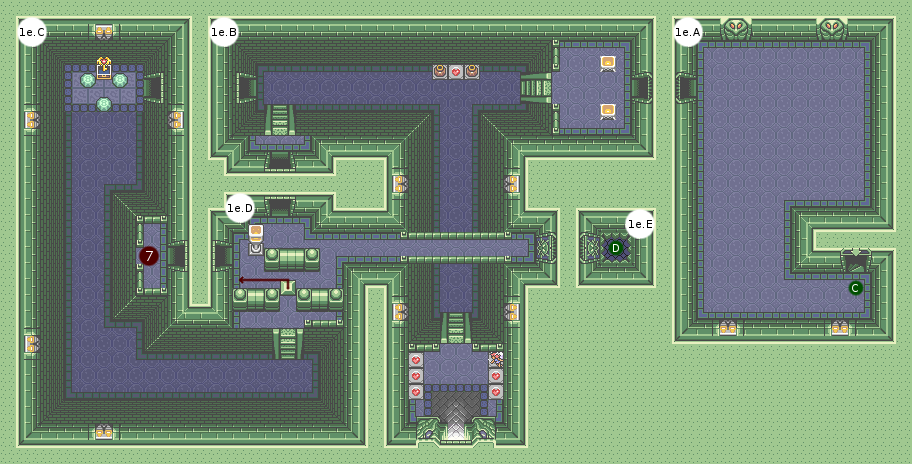 |
| 1st Floor | 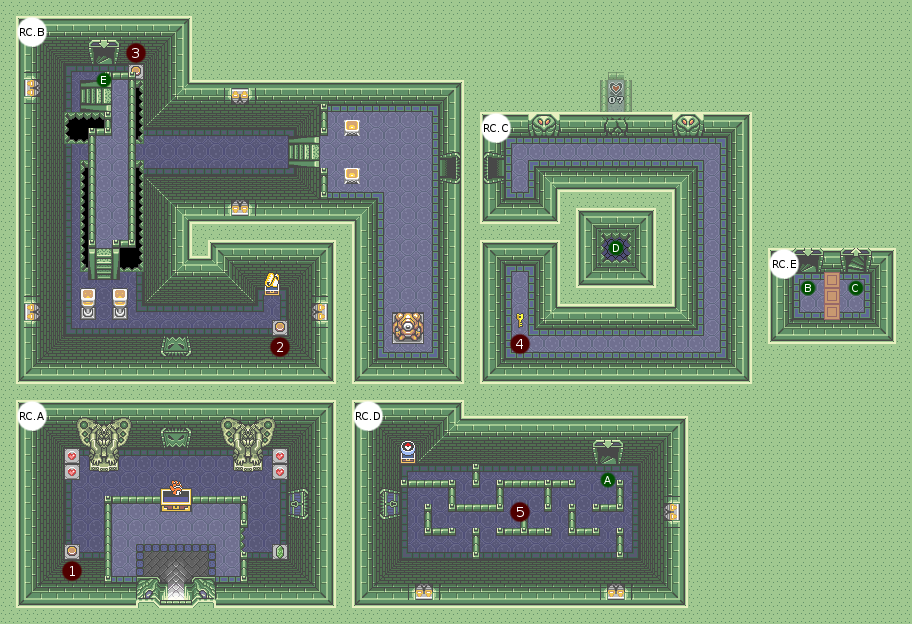 |
| Basement 1 | 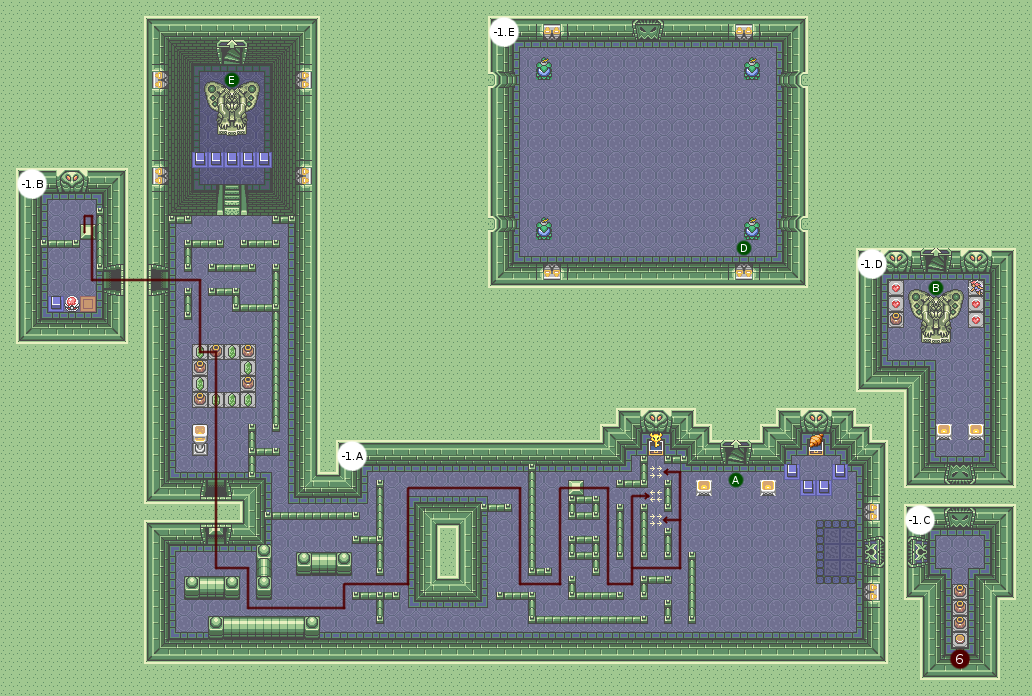 |
| Room | Enemies |
|---|---|
| B1.A | Soldier (x3), Tentacle (x5), Bubble (x1) |
| B1.B | Tentacle (x1) |
| B1.E | Papillosaur King (BOSS) |
| 1F.B | Bubble (x1), Soldier (x1) |
| 1F.C | Tentacle (x6) |
| 1F.D | Tentacle (x4) |
| 2F.A | Khorneth (MINI-BOSS) |
| 2F.B | Bubble (x1) |
| 2F.C | Tentacle (x4), Bubble (x2), Minillosaur (x3) |
| # | Event |
|---|---|
| 1 | Open north door |
| 2 | Chest appears |
| 3 | Open south door |
| 4 | Loot key on a Tentacle |
| 5 | Chest appears when all enemies are dead |
| 6 | Open north door |
| 7 | Chest appears when all enemies are dead |
Walkthrough
At first, get off the platform and lift the vase in the lower left corner. The switch below will open the door to the north. Once the door is over, it closes behind you. To reopen it, it will be necessary to raise the vase to the north by going up the staircase and to pass on the switch, but before lift the vase to your immediate right. A chest appears, giving you the Map. Then walk along the left wall, paying attention to the holes, and go to the room to the east. Note the crack north of the wall, behind hides the Piece of Heart #07 that you can get as soon as you get the Bombs. Kill the Tentacles until you get a Small Key. Then go down to the entrance and turn the door on the right. In this room, kill all the enemies to reveal the chest containing the Compass, then go down the stairs of this same room.
Once on this new floor, clean the map but do not touch the jars that trap the Bubble. This room is about finding a way to take the trunk located behind the three trapped soils. For this, you will have to place the blocks so that you can not be deported from the corridor. Once the housework is finished, start by pushing the block closest to your arrival according to the route indicated on the map. It is better to start by placing it on the top right of the treadmills to avoid any unfortunate blocking. Once the first block is placed, drag the second block into the left door. Once this new block to destination, go get the last block in the northwestern room. Kill the Tentacle if you have not already done so, flip the crystal lever to retrieve the Croissant into the chest blocked by the blue pads, then slide the block to the vases. There, the Bubble may be embarrassing. To minimize the breakage, it is advisable to proceed one vase per vase. First, remove the vase from the top left corner and place the block. Then, when the Bubble deviates from the path of the next vase you are aiming for, destroy the vase and quickly slide the block into it. He is now trapped and you can still move the block one step down (or to the right if you have destroyed the vase at the bottom of the first one). At this point, your block is in the inner square of the vases, in the upper left corner. The next step will force you to release the Bubble by breaking a vase, no matter which (preferably the one on the path between the block and the door), and once the Bubble is released you must not be discouraged by the blows that he can give, and always push the block until it reaches the door. Remember that it is faster to push the block by holding the action key than to advance. Once in the door, you are safe and you can finish the journey as with the second block. By doing well, you can avoid the Bubble completely or get away with two shots maximum. A fairy awaits you in a short time if you feel a little low in energy.
Once the riddle of the blocks is complete, you get the Big Key. Reactivate the crystal switch so that the blue is up and the orange is down. The room on the right contains a switch that opens the door to the north on the last vase in the row. The next room contains vases with hearts and a fairy. If you can, store the fairy, because there are enough hearts under the other vases to give you your whole life. Go to the upper floor, then a second time. You arrive in Khorneth Hall, the mini-boss of the dungeon.
Mini-Boss: Khorneth
Khorneth is not a very difficult enemy. His weak points are in his wings and then his body. Four shots at each wing, and five shots at the body will get the better of him. If you have trouble touching it because it is constantly moving, wait for it to come to a stop to give you a wing shot: the magnitude of the movement means that you should be able to touch it while being far enough to dodge it. he comes to you. Note that for the moment, its wings are insensitive to the loaded blows (they do not do twice as much damage as it should).
Going to the boss
Once Khorneth is destroyed, continue on the next T Hall, and fork down. The jars contain once again hearts and fairies. Get out of the dungeon: you have Piece of Heart #03. Then jump from the cliff to enter the dungeon again through the main entrance. Now you can grab the Iron Gloves in the Big Chest of the entry. Head back to the T room on the second floor, but this time continue straight. Your mission will be to kill all the enemies of this room. Minillosaurs may appear violent, hide in the door if you feel overwhelmed by enemies. To destroy the last enemy (the Tentacle on the ledge), you have to push the block upwards after going around the room from below, then go back to the T room to take the stairs and push the block towards left. Once the room is cleaned, you have access to the Boss Key (lift the stones to reach the chest). All you have to do is turn once again to the left staircase of the T-room, then east to arrive in front of the Master of the Places door. Use the key and jump into the hole. You arrive in front of your first boss.
Boss: Papillosaur King
The room is surrounded by bombflowers that you can now wear with your Iron Gloves. The boss just walks around the room sending his children in full pear (eggs that ensue become Minillosaurs). The goal is to take the bombflowers and throw them on the King. The more damage you do him, the more he will send you hellish spawn. One trick is to stay on one side of the room when it throws its eggs, to concentrate the enemies in the same place, and to go to the opposite to throw the bomb, but you can also quickly find yourself submerged by the offspring . Another possibility is not to ask questions and to send the flowerbombs following a precise path (for example clockwise). A last way to proceed is to kill the Minillosaurs with great support of bombflowers (it kills them in one shot), but you may not get away on the end because bombflowers take time to push back. An approved technique is to cut the grass under his feet: the moment he throws his eggs, a small noise is heard. Just throw the package when you hear this sound, it will prevent him from launching his offspring. Remember that you can let the fairy give you life if you run out of hearts, allowing you to throw yourself into battle. Six bombs will be enough to get rid of this huge lepidopteran, but be careful with the last shot: instead of walking randomly in the room, the King will rush on!
You have defeated this monster, you are entitled to a new Heart Container and can go and release the first Child of Solarus.