Maps and useful informations
| Floor | Map |
|---|---|
| 1st Floor | 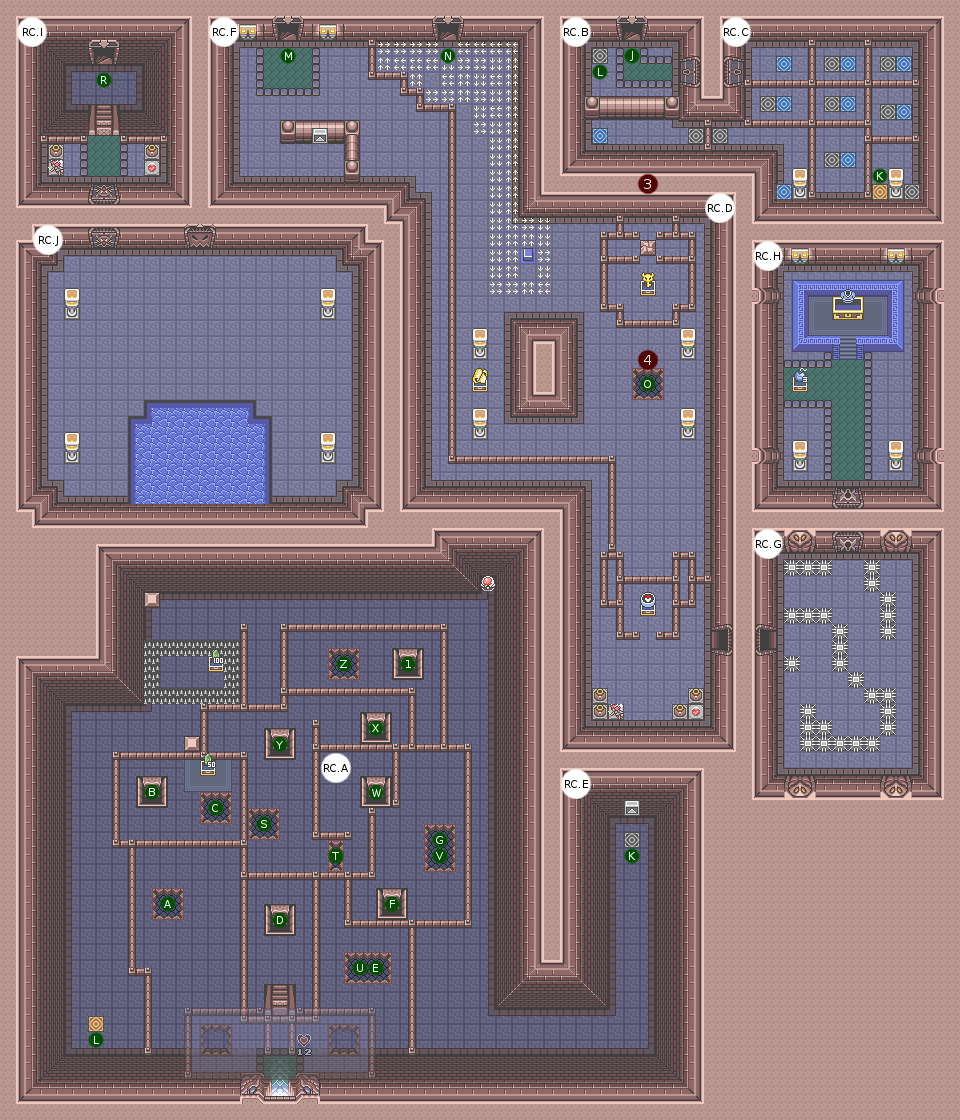 |
| Basement 1 | 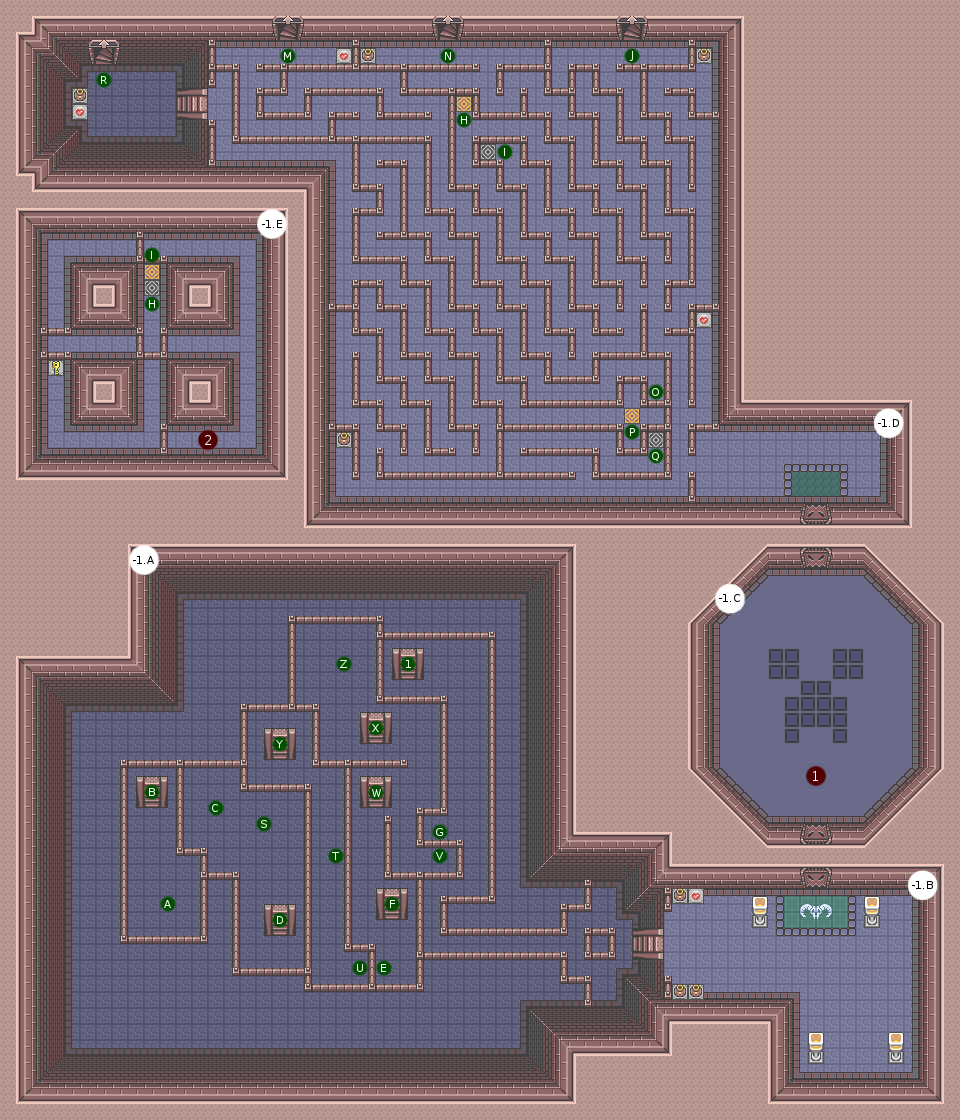 |
| Icy room |  |
| Room | Enemies |
|---|---|
| B1.A | Skeletor (x3) |
| B1.C | Evil Tile (x20) |
| B1.D | Red Bullblin (x2), Tentacle (x6) |
| 1F.D | Skeletor (x1) |
| 1F.E | Skeletor (x1), Red Bullblin (x1) |
| 1F.F | Skeletor (x1), Red Bullblin (x1) |
| 1F.G | Blue Hardhat Beetle (x4) |
| 1F.J | Flora Gohma (BOSS) |
| # | Event |
|---|---|
| 1 | Wait for evil tiles to stop |
| 2 | Come back to the invisible switch |
| 3 | Bomb to open the path |
| 4 | Bomb to open the path |
| 5 | Blue tunic required |
Walkthrough
This dungeon is much simpler in appearance than the first, it is only on two floors, but they are two floors with a lot of labyrinths, small traps and passages between the constant stages. The first main room is a huge maze of stairs and holes. For more readability on the map, the first room takes up all of this labyrinth (the inner side of the room).
Start by falling into the left hole. Climb the only possible staircase, you arrive in front of a chest of 50 rupees. Fall in the second hole, going up the stairs you go back to the entrance. This time, drop into the right hole on the main platform, and before doing anything go to the left under the platform to recover Piece of Heart #12. You should have your tenth heart. For the continuation, follow the indications well because the least error generally means: return to the entry. Fall on the right side of the hole. Take the first staircase (the lower one), and then drop into the hole on the north side. Now follow the path to the south and you arrive in the continuation of the dungeon.
Go to the next room, there are 20 evil tile waiting for you. Little trick: put yourself against the south door, and pull your grapple as soon as the slab enters your field of vision or when it moves if it is already visible. This allows you to have a small invincibility that should get you through the room without much trouble. Another technique is to stuff the touch of attack: the sword blows explode the slabs flying before they touch you (you can also leave your sword drawn). Otherwise, you can always run in a circle. Choose the method that suits you best. In the next room is a huge labyrinth. Your first goal is to reach the teleporter north of the room (under the central stairlift).
For this, from the entrance, take the first entrance on the left and then follow the path from the top. You arrive in a trap room, with slabs invisible buttons. The path is rather linear, only the southern slab could be disturbing: it shows a wall instead of making one disappear. It is therefore necessary from the wall to walk again without exceeding it (go there at once) so that the wall disappears and immediately change direction to go towards this new passage (or conversely, when you arrive from the “normal” path, from that the wall appears, turn around and go back on the slab: the wall will disappear). Under the vase is a Small Key. Return to the teleporter, you’re back in the middle of the maze. Now you have to access the door at the top right of the room…
Head to the right until you reach the main wall of the room, then follow the right wall to the north. You will arrive at the right staircase. Climb, and open the locked door. Here you have no choice at the teleporter level, you must always go to the right. When the next teleporter is on the left (just south of where you entered), leave a bomb against the wall, on the same vertical line as the cracked rock below. Open the chest after dynamiting the rock in question, and you access the Big Key (do not worry about the Map and the Compass, you will recover them very quickly).
Retrace your steps until you take a non blue but yellow teleporter. You arrive at the edge of the labyrinth of the entrance. Here, a clue tells you what you will need to use your plan to discover the flaw you have just created to recover the Big Key. Keep going and turn on the crystal switch to the north to make it blue. Continue to the next teleporter (do not worry about the chest for now, you can only get it after having the subject of the next dungeon). You came back to the room just before the blue teleporters. Go back down. Now, you will first have to go to the leftmost staircase of the labyrinth (but not the stairs below).
Return to the big intersection of this labyrinth, next to the vase on the right. Take the path back to the North Teleporter, but instead of rushing into this path, take the one south and walk along the south wall all the way. If you go constantly left taking the north teleporter path, it works too, but it’s a bit longer. Climb the stairs, follow the only path available, get the Compass and go to the room to the east. Kill the enemies of this room (watch out for the spades, the enemies have a recoil on you) and use the Big Key to open the access to the Big Chest. The small chest contains 3 Bombs, and you now have the Blue Tunic protecting you from the cold. Next step: the central staircase of the labyrinth.
So go back to the main junction of the labyrinth, and this time take the north path, just to the right of the one leading you to the teleporter. Climb the stairs, and you have no choice to continue south on the treadmills twice. The crystal switch you activated is used to continue your way here, so take a right from the blue stud, and open the chest to get the Map (definitely, everything has been done in the opposite direction here!). Place a bomb at the intersection of the four vaults visible from this room, and you will open the passage allowing you to access the teleporter of the cold room of the dungeon. Use your grapple to access one of the platforms on the side of the chest, then use the grappling hook on the chest to get the Boss Key.
Now you have to go to the only maze staircase you have not visited yet: the one all the way west, after the small staircase. For this, always walk along the south wall from the entrance of the labyrinth. You will eventually access this exit. Enjoy the fairy just before the boss room, and attack.
Boss: Flora Gohma
Another plant. Like Master Arbror, she mostly fears the grappling hook. Be careful, because it always spawns enemies on the ground, killing them is useless (they have a chance on two to give you a heart). At first, you must get rid of its petals around its moving eye, all thanks to the grapple. There is no real trick, especially some agility. Once all petals are removed, Flora Gohma becomes susceptible to normal attacks. Only his eye is sensitive, so it must be attacked from the top of the room, because its tentacles will touch you before you can kick from the sides. Three strokes of grapple per petal, and twelve strokes of swords will be necessary to overcome this flowery cyclops. His death automatically leads to the death of his subjects. If possible, rather paralyze the snapdragons instead of killing them: they stop appearing to a certain number, so you do not get overwhelmed too quickly…
Once defeated, you can recover the Heart Container and access the last Child of Solarus. An old acquaintance appeals to you. After the little discussion that follows (and the good old Machiavellian laugh proper to any good villain), leave the Palace and go to the south of the dark room following the only stairs available to go out in the open. What a change of scenery, is it not?