Maps and useful informations
| Floor | Map |
|---|---|
| 2nd Floor | 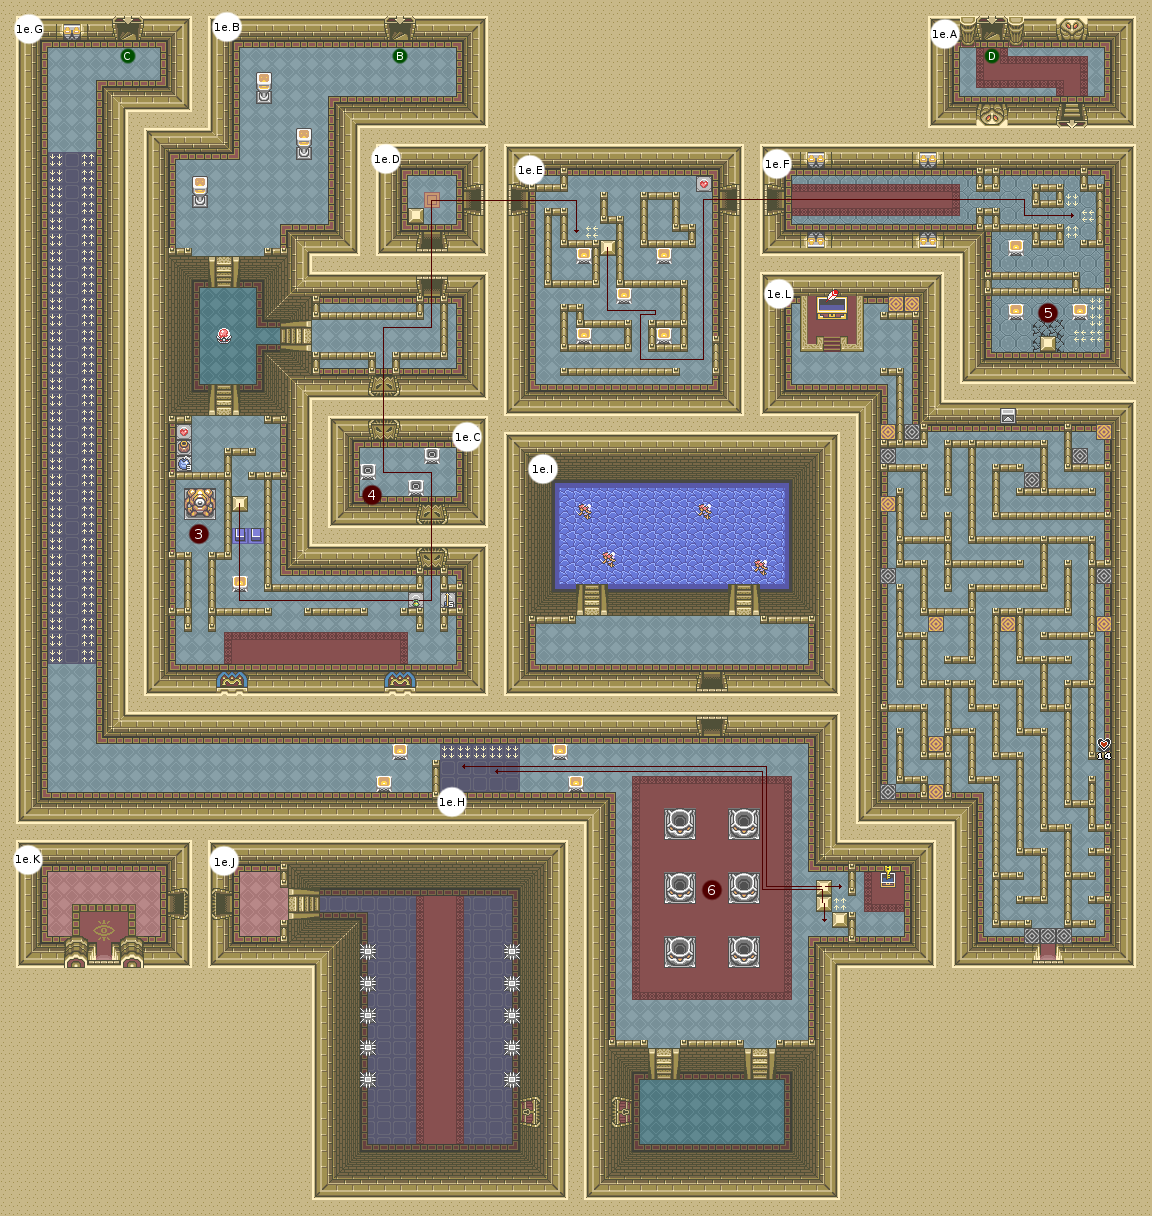 |
| 1st Floor | 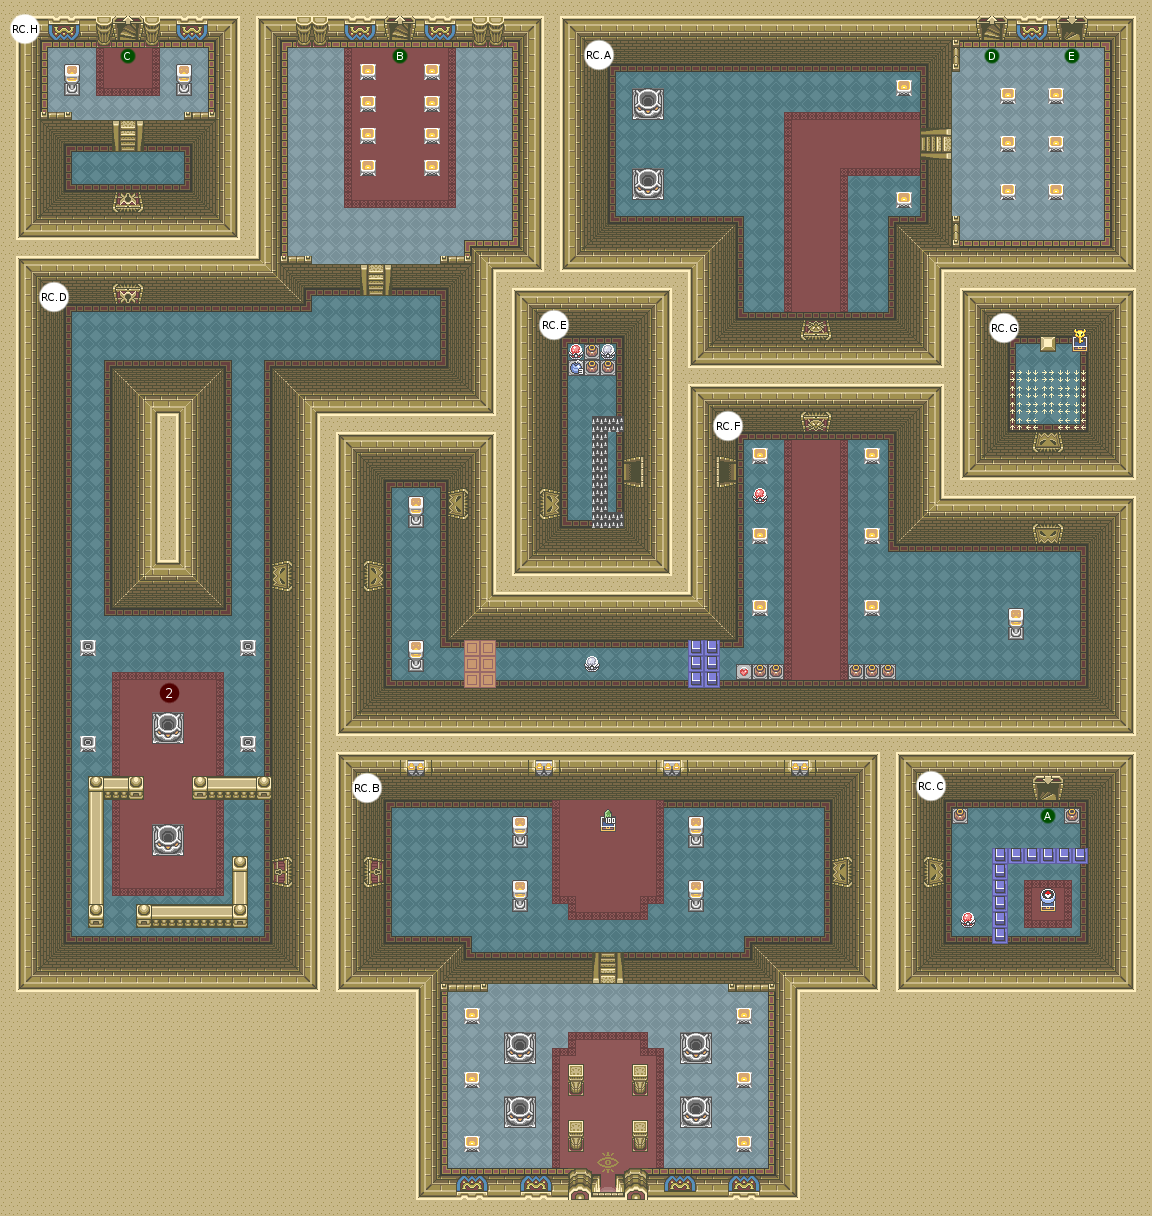 |
| Basement 1 | 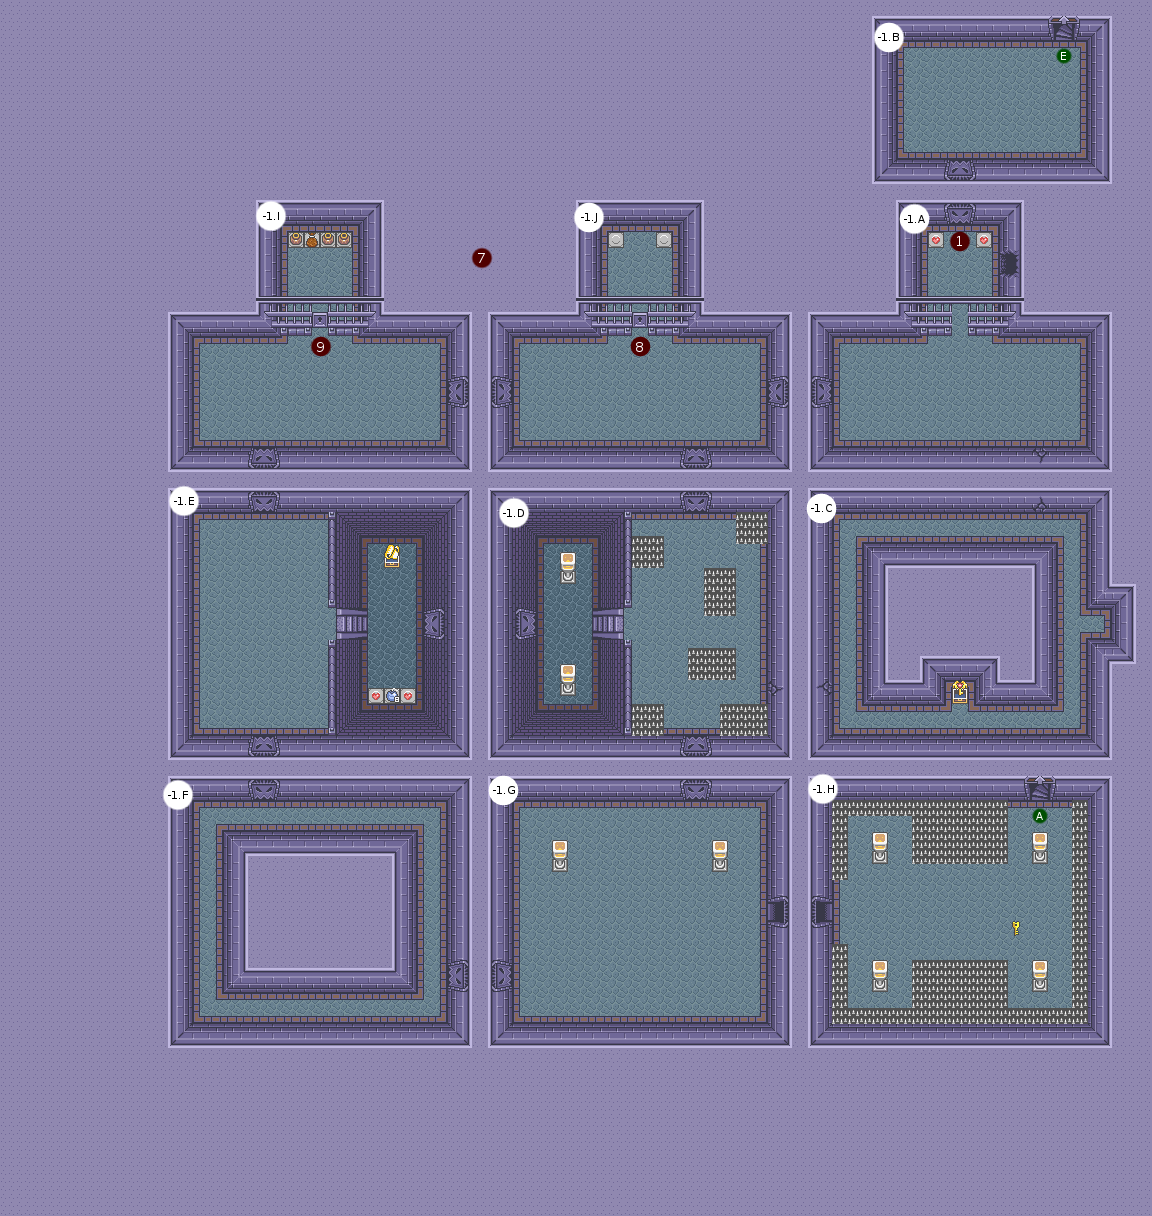 |
| Room | Enemies |
|---|---|
| B1.A | Blue Knight (x1) |
| B1.B | Green Knight (x2) |
| B1.C | Black Knight (x2) |
| B1.D | Red Knight (x1) |
| B1.E | Black Knight (x2) |
| B1.F | Black Knight (x1) |
| B1.G | Black Knight (x1) |
| B1.H | Blue Knight (x1), Green Knight (x1) |
| 1F.A | Red Knight (x1) |
| 1F.B | Green Knight (x2) |
| 1F.C | Blue Knight (x1) |
| 1F.D | Blue Knight (x2), Red Knight (x1) |
| 1F.E | Green Knight (x1) |
| 1F.F | Black Knight (x1) |
| 2F.B | Black Knight (x3), Blue Knight (x1) |
| 2F.E | Green Knight (x1) |
| 2F.F | Red Knight (x1) |
| 2F.G | Red Knight (x1) |
| 2F.J | Green Knight (x2) |
| # | Event |
|---|---|
| 1 | Opened when the main gate is closed |
| 2 | Light up torches to open east door |
| 3 | Shot statue eye to open the door |
| 4 | Light up torches to open the door |
| 5 | Put down a bomb on the conveyor (the arrows) |
| 6 | Turn around the pot counter-clockwise |
| 7 | Doors between rooms randomly opened |
| 8 | Fake lock |
| 9 | Iron Key required |
Walkthrough
This dungeon is a bit special because it requires some phases of infiltration (which is not necessarily easy when you’re a nag like Link busier mowing the garden than going into a stealth strategy … Fortunately, the guards also dried up the surveillance formations a bit, so that should be fine). If during these phases of infiltration, you are spotted, you land directly in the dungeon, forcing you to retype all the way you had done, in addition to having to find a way out of the dungeon at first glance. I will explain here the detail of the dungeon, so we get rid of it. First of all, the door of your cell gives way when you examine it a little too much (the first time, the following times it gives away). Then, the doors connecting the various rooms of the first basement are randomly open, so that the path to escape is potentially never the same (although there are not so many variants that). There is the Dungeon Map in the room south of the cell on the left, just down the stairs behind the guards to reach it. The most difficult is the last room (mandatory) to go out, because it contains two black guards (the famous guards who stop instead of typing) that cross … We must choose one of the guards and follow him as close as possible to reach the north exit. A little training and it should pass. Note that it is in this room that will appear the chest containing the Key of the Boss of the Dungeon, but I will return to it.
Let’s start with the beginning. The chest at the entrance gives you 100 rupees. On the right is a chest with the Compass. Go down one floor and kill the guards. Blue has a Small Key. Return to the entrance by killing the blue guard on the floor to open the door, and turn left of the entrance. Open the door, kill the guards and light the torches. Take the stairs to the north in the great room with the torches, and go up one floor. Here is THE relook passage of this dungeon. A go will be fine, but the return will be much more complex, more because of a lack of reference than anything else. As soon as you are in the room, go immediately sticking in the upper left corner of it. This is one of the few really secure points. You’re going to have to do some kind of S, passing behind the left of the first torch, sticking to that torch and shifting to the right wall when the guard is going down, and then quickly go south and finally go out on the left. Once in the room of the crystal switch below, you are safe. For the moment.
The crystal switch must be blue. Take the south staircase, kill the guard, shoot an arrow in the eye of the statue, and push the block at the bottom, right, bottom, right against the second jar (free the passage by breaking the first ), up to the torch, on the left, pause by lighting all the torches to open the passage, and reassemble the block as far north as possible. Activate the crystal switch so that it is red, push the block to the right, then up to position it on the orange pad, and push it to the right so that it is a notch before the arrows (attention, do not push it to the end or you will have to go down one floor and come back to start all over again …). Go around the room from below, then finally push the block to the south to be able to pass over the arrows without being deported. A new block is waiting for you. Push it all the way down, then three notches to the right (to be able to pass behind from the same zone), one notch to the left, to the south, to the right, to the north to the vase, then to the right, a notch down and finally right. Stick to the wall just above the arrows to the south of the room, and lay a bomb. She will be deported, and will drop the block a floor lower. You can now leave.
To leave without being caught by the guard, the key is speed and accuracy. Hide behind the torch in the south or south-east corner closest to the staircase flush with the guard’s round, and as soon as the guard has passed you by going north, turn on. The path is the same, ie between the torch on the right and the wall, go up to the corner of the wall, go left and go up. You are safe, but the key is the liveliness of execution. Go back to the spot where you lit the torches next to the entrance, enter through the door that it had opened, and throw your boomerang against the crystal switch (if you do not have direct access) to unlock access to the small room above. Turn on the crystal switch, and put a bomb on the red crystal switch to turn blue once you have passed the two rows of orange pads. You have time, do not stress with the Pegasus Boots. Be careful here, because there is another black guard … Go first along the south wall by destroying the vases (normal that it does not make react the guard), then the wall is. In the mini-room to the north, you can use the grappling hook to retrieve the Big Key from the trunk. Return to the room with the black guard (any arrow takes you there, the fastest is the one on the right), and go straight to the west. You are back in the small room with the two crystal switches. Small shortcut you avoid risks, put back spades and go into the wall next to the door. The rebound makes you go on the right side.
Continue west and then north through the gate with the Great Lock. Go up one floor, follow the corridor until you reach the room with the red carpet and the six giant pots. Here, start along the pots to the left, continue to go around the bottom, then go back to the right to finally get back to your starting point, all without ever going to the center of the pots (otherwise you have to start again). You unlock the hidden chest of the basement. The problem is that you can not go back (except by a save + quit, but you will have to make this passage to get the equipment of this dungeon anyway). To the right of this room is a chest. Use the usual movement (the one on the top right and the middle one on the bottom) to access it. With this Small Key, open the door to the south. In the next room beware of spades, they will clash when you pass. Use the Pegasus Boots from the red carpet to pass safely. Follow the only path available through outdoor balcony. Here, take the north path teleporter, then go to the left to reach the only teleporter available (you can also access it from the teleporter of the right corridor at the entrance, it is the closest to you in this case) you should be in the small square at the top right of the room, only one teleporter is accessible, then take the way down to reach the last teleporter. You have no choice on the last one, and you are now in front of the Big Chest. Using the Feather, jump into the far right teleporter, then over the teleporter to the south (or use the Boomerang) to reach Piece of Heart #14. Take this teleporter and you are at the entrance of the labyrinth. You can now turn back.
Once in the large pot room, slide the blocks to the left (against the central pot), then to the north and then to the left (making sure you have left room to slip between the north wall and the block). Use the torch on the right to better wedge the block, and put a first block against the second arrow, and the second block against the fourth arrow. You can now jump to the left, using the blocks to not be deported. The easiest now is to get stopped, it will allow you to explore more easily the basement. As I said in the introduction, here you will have to find your way to the exit. The room where the two black guards meet is the room where the Master Key is. To recover it, you must follow the guard from the bottom going to the right as soon as they crossed each other. Retrieve the key, and return to the cracked wall. Wait until they iron, and this time follow it to the shelter on the right of the room. Once the one coming against you has passed you, continue north and exit to take back the main entrance of the castle. A great speed can allow you to go directly from the crack towards the north and towards the exit before the guard coming against you points out. Return to the room with the two crystal switches, this time you can cut through the pen to go right. Open the door of the Boss, and go up the floors until you reach the roof of the castle.
Boss: Agahnim
That good old Agahnim. His tactics remain the same as all previous clashes. He will send you fireballs at first, play tennis with him until he takes it. Sometimes he will add to the game by adding explosive balls (they are blue instead of red), then he will send three in a row. With each rebound of his projectiles, their speed increases, continue to send them back until he abandons the fight. Two fairies will not be too much to help you, especially since the automatic restoration of hearts can help by avoiding having to think about healing. He gets angry after five balls of fire sent back into his head, and you will have to send him a total of ten times his spells. It is necessary to be placed approximately in the center of the T to make effective referrals, in particular to the nearest of him and to stuff the blows of sword when the balls are in number of 3 (if not, to stay with just the sword unsheathed in Agahnim face works). For the blue balls, stay away from him while staying well in line of sight compared to his aim. The balls bounce symmetrically, and the fewer balls you start out anyway, the better you’ll be. The balls disappear after a certain number of rebounds, hence the importance of being far away (so that they all go in the same direction before you dodge them) and do it in a straight line. Good luck.
Once defeated, you can recover the Heart Container and continue your journey. Attention, if you leave the game here, the next backup will make you reappear on the roof: enter and leave the dungeon before saving to properly initialize your point of return.